Table of Contents
How to set up the eCards plugin
Installation
- Upload the
/ecards/folder to your/wp-content/plugins/directory - Activate the plugin via the Plugins menu in WordPress
- Create and publish a new post or page, attach an image or more, and add the
[ecard]shortcode - Note that there is no way to attach images only in the block editor — if this is the case, use the image IDs (read more below)
- A new eCards menu will appear in your WordPress Dashboard
Usage
Adding eCards to a post or a page is accomplished by uploading one or more images for the [ecard] shortcode.
Images can be uploaded directly to the post or page where the shortcode is present, not attached from the Media Library. Inserting the images is not necessary, as the plugin creates the eCard automatically and displays all uploaded/attached images.
If your images are already uploaded, and they are present in your Media Library, use their IDs to display them:
[ecard id="1, 2, 3, 4, 78"]
The IDs correspond to images in your Media Library. This feature eliminates the need to manually attach images and also eliminates the need to upload the same image multiple times, just to have it attached to different posts or pages.
Add the [ecard] shortcode to a post or a page, or call the function from a template file:
<?php
if ( function_exists( 'wp_ecard_display_ecards' ) ) {
    echo wp_ecard_display_ecards();
}
Remember: If you use WordPress 4.9 or lower or ClassicPress, use the Add Images button to upload images to your post or page. Do not insert them into the page, as the plugin does it automatically.
Note: When an eCard is sent, it uses the large version of the image, as the maximum allowed email width is 600px.
Email Deliverability
To avoid your email address being marked as spam, it is highly recommended that your “From” email header domain match your website. Some hosts may require that your “From” email header address be a legitimate address.
Emails sometimes end up in your spam (or junk) folder. Sometimes they don’t arrive at all. While the latter may indicate a server issue, the former may easily be fixed by setting up a dedicated email address.
If your host blocks the mail() function, or if you notice errors or restrictions, configure your WordPress site to use SMTP. We recommend Post SMTP Mailer/Email Log.
Finally, go to the Diagnostics tab and check if your mail sending function is working.
Settings
Go to the Labels tab and configure (or translate) the strings as necessary.
The plugin is configured to use the best settings for your site, but you might want to check all the tabs — Settings, Email Options, Restrictions, and Labels — and change the options as necessary.
How to customize the eCards appearance
Recently added to our eCards plugin, a new set of options to customize the appearance of eCard thumbnails is now available.
In eCards Settings → Settings tab, check out the options below:
Card Grid
This is the number of eCards per row. The grid uses the CSS Grid Layout Module, so it works with any page builder out there.
Card Image Size
This is the size of the eCard thumbnail and, depending on your theme design, it can be square, portrait or landscape.
Card Design
This is a set of options, including box shadow, box highlighting and border radius. Note that a border can also be applied using the Custom CSS tab. An example of a black border with a white highlight is below:
.ecard-grid-item label {
    border: 3px solid #000000;
}
.ecard-grid-item label:hover {
    border: 3px solid #ffffff;
}
Card Colour Scheme
The colour scheme can be either light or dark, and it should match the overall theme of your website.
Card Accent Colour
The accent colour applies to the eCard radio boxes and the highlight border (if enabled).
Experiment with these settings to find the best design for your eCards pages.
How to design and style an eCard email
The eCards plugin features an email designer section, with a rich-text editor.
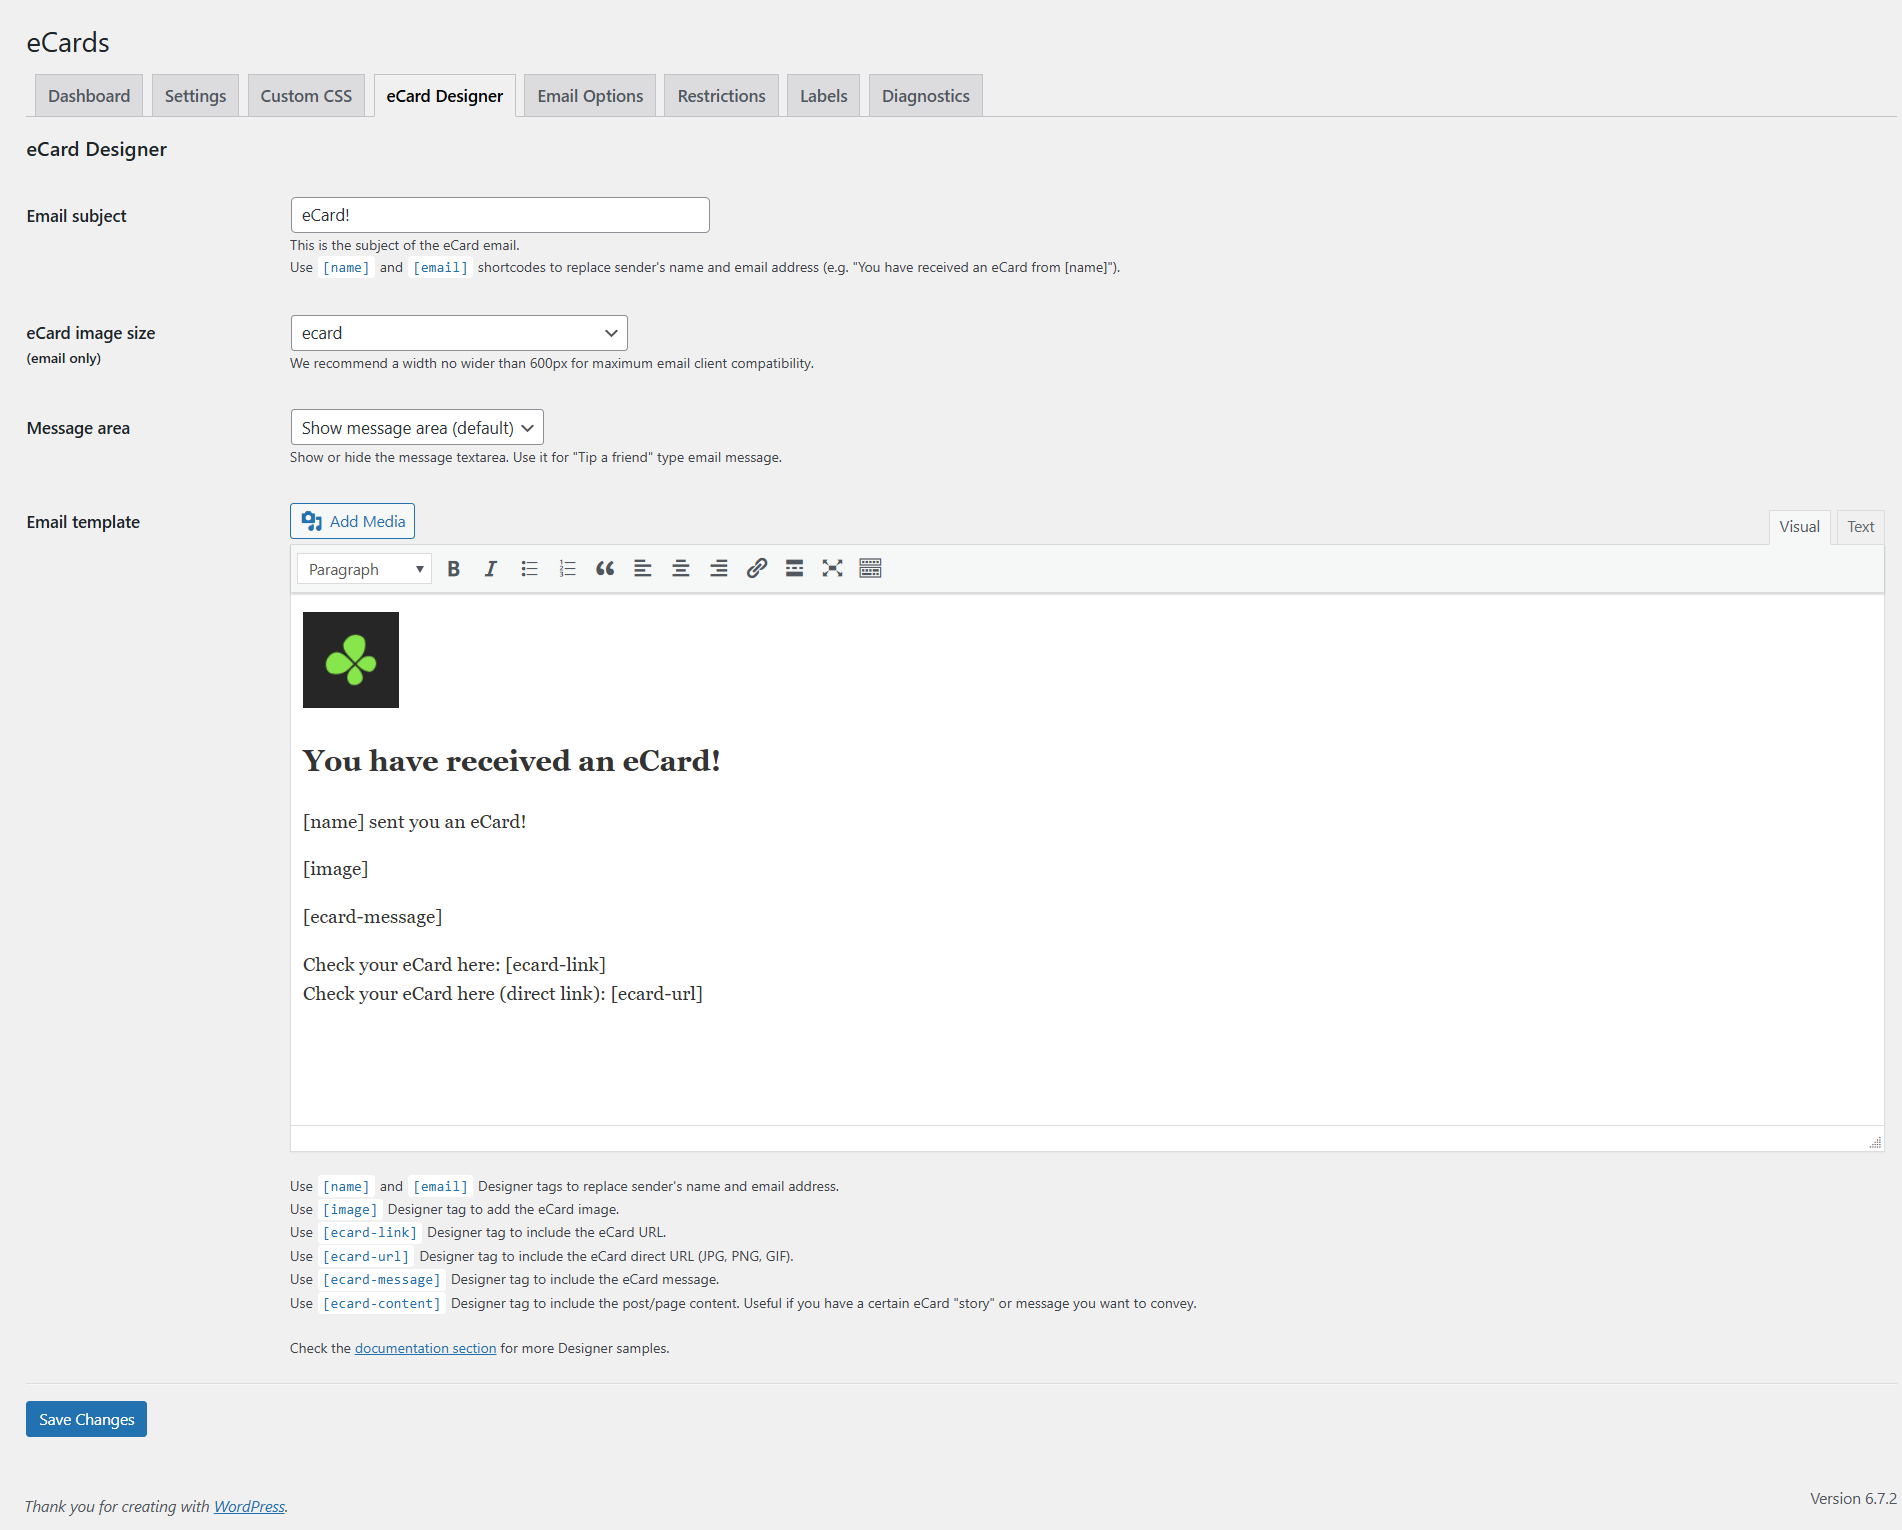
Here’s an example of a template. Use the following template as a starting point for your own:
You have received an eCard!

[name] sent you an eCard!

[image]

[ecard-message]

Check your eCard here: [ecard-link]

Check your eCard here (direct link): [ecard-url]
How to use IDs for specific eCard images
Sometimes you have images attached to different posts or images already existing in your Media Library. Attaching them to an eCard form is easy.
Use the desired image IDs to create a custom eCard form:
[ecard id="1, 2, 3, 4, 5"]
The IDs correspond to images in your Media Library. This feature eliminates the need to manually attach images and also eliminates the need to upload the same image multiple times, just to have it attached to different posts or pages.
This update also helps with the missing Add Media button in the block editor, which was heavily used to attach images to posts.
How to use eCard collections
Sometimes you want to create a specific eCard collection to use on one or multiple pages. Creating an eCard collection is easy.
First, create a collection by going to the eCard Collections menu item in your WordPress dashboard and selecting Add New.
Create a gallery block and add as many images as you want. You don’t need to worry about the gallery settings, as the eCard will automatically detect the image IDs inside the gallery.
Next, in your eCard form page, use the collection ID shortcode:
[ecard collection="123"]
Requirements
- eCards plugin (latest version)
- A gallery block or a gallery shortcode
How to set up a paywall for eCards
The eCards plugin does not have any payment gateways included. The only restriction it has is a member-only restriction.
There are other methods, however, to add an eCard page behind a paywall.
Here are 3 methods:
Paid Memberships Pro
Use the Paid Memberships Pro plugin to create various subscription plans (or tiers), and then restrict the page (or the post) for users with a specific plan (or tier).
Restrict Content Pro
Use the Restrict Content Pro plugin to create various subscription plans (or tiers), and then restrict the page (or the post) for users with a specific plan (or tier).
Gravity Forms + Gravity Forms Stripe
Use the Gravity Forms plugin plus the Gravity Forms Stripe add-on to create a payment form, and then set up a confirmation (or “Thank You”) page with the desired eCards.
Note that there are more membership plugins out there, or even payment gateway plugins, that can be integrated with our eCards plugin.
How to sell eCards using WooCommerce (option 1)
You can do this cleanly and securely inside WordPress/WooCommerce, without needing extra plugins — by combining a virtual WooCommerce product, a custom shortcode, and a purchase check.
✅ Overview
- Create a virtual WooCommerce product (no shipping, no downloads).
- Create a protected page (contains your shortcode, e.g.
[ecard_page]). - Restrict that page so that only users who purchased a specific product can access it.
- Others see a message or are redirected to buy.
1. Create the WooCommerce Product
In your WordPress dashboard:
- Go to Products → Add New.
- Title: “eCard Access”
- Product data:
- Check Virtual.
- (Optional) Check Downloadable if you want to add files.
- Price: e.g.
€5.00 - Publish.
Take note of the Product ID — you’ll need it below.
2. Create the Protected Page
Create a new page, e.g. “Your eCard”, and insert your shortcode in the content:
[ecard_page]Then publish it.
3. Add the Access Restriction Code
Add this to your theme’s functions.php or your custom plugin:
add_shortcode('ecard_page', function () {
    if (!is_user_logged_in()) {
        return '<p>You must <a href="' . wp_login_url(get_permalink()) . '">log in</a> to view this page.</p>';
    }

    $user_id = get_current_user_id();
    $product_id = 123; // Replace with your WooCommerce product ID

    // Check if user has purchased the product
    if (function_exists('wc_customer_bought_product') && wc_customer_bought_product('', $user_id, $product_id)) {
        // Access granted: show your content or shortcode logic here
        return '<h3>Your eCard</h3><p>This is your exclusive eCard content!</p>';
    }

    // If not purchased, show purchase prompt or redirect
    $product_url = get_permalink($product_id);
    return '<p>You need to <a href="' . esc_url($product_url) . '">purchase this eCard</a> to access this page.</p>';
});
4. Optional – Redirect Non-Buyers Automatically
If you prefer to redirect users instead of showing a message, replace the “not purchased” section with:
wp_redirect(get_permalink($product_id));
exit;
5. Optional – Hide the Page from Search/Index
Since it’s a protected page, you might want to prevent search engines from indexing it:
- In the page editor, set noindex in your SEO plugin (Yoast, Rank Math, etc.).
- Or add manually:
add_action('wp_head', function () {
    if (is_page('your-ecard')) {
        echo '<meta name="robots" content="noindex, nofollow">';
    }
});
✅ Summary
- User visits
/your-ecard/ - If not logged in → login prompt
- If logged in but hasn’t bought the product → purchase prompt
- If bought → full shortcode content displayed
How to sell eCards using WooCommerce (option 2)
✅ Step-by-step Integration with WordPress eCards
1. Create a WooCommerce Product
- Go to Products → Add New
- Name it: Send an eCard
- Set it as Virtual and Simple product
- Set your desired price.
- Publish and note the Product ID.
2. Create a Protected Page
Create a new page, e.g. Send an eCard, and insert your eCard shortcode:
[ecard]This is the page users will access after purchasing.
3. Restrict Access to Buyers Only
Add this snippet to your custom plugin or functions.php:
add_action('template_redirect', function () {
    // Set your page and product IDs
    $protected_page_id = 1234; // ID of your "Send an eCard" page
    $product_id = 5678;        // ID of your WooCommerce product

    // If we're not on that page, skip
    if (!is_page($protected_page_id)) {
        return;
    }

    // Require login
    if (!is_user_logged_in()) {
        wp_redirect(wp_login_url(get_permalink($protected_page_id)));
        exit;
    }

    $user_id = get_current_user_id();

    // Check purchase
    if (!wc_customer_bought_product('', $user_id, $product_id)) {
        // Redirect to the product page if not purchased
        wp_redirect(get_permalink($product_id));
        exit;
    }

    // Otherwise, user can view the page — do nothing.
});
4. Optional – Hide the Page from Search Engines
If you don’t want the eCard page indexed:
add_action('wp_head', function () {
    if (is_page(1234)) { // same ID as above
        echo '<meta name="robots" content="noindex, nofollow">';
    }
});
✅ Result
- User visits
/send-an-ecard/:- If not logged in → redirected to login.
- If logged in but hasn’t bought the product → redirected to buy page.
- If logged in and purchased → can view the page and send an eCard.