Table of Contents
Introduction
Configuration
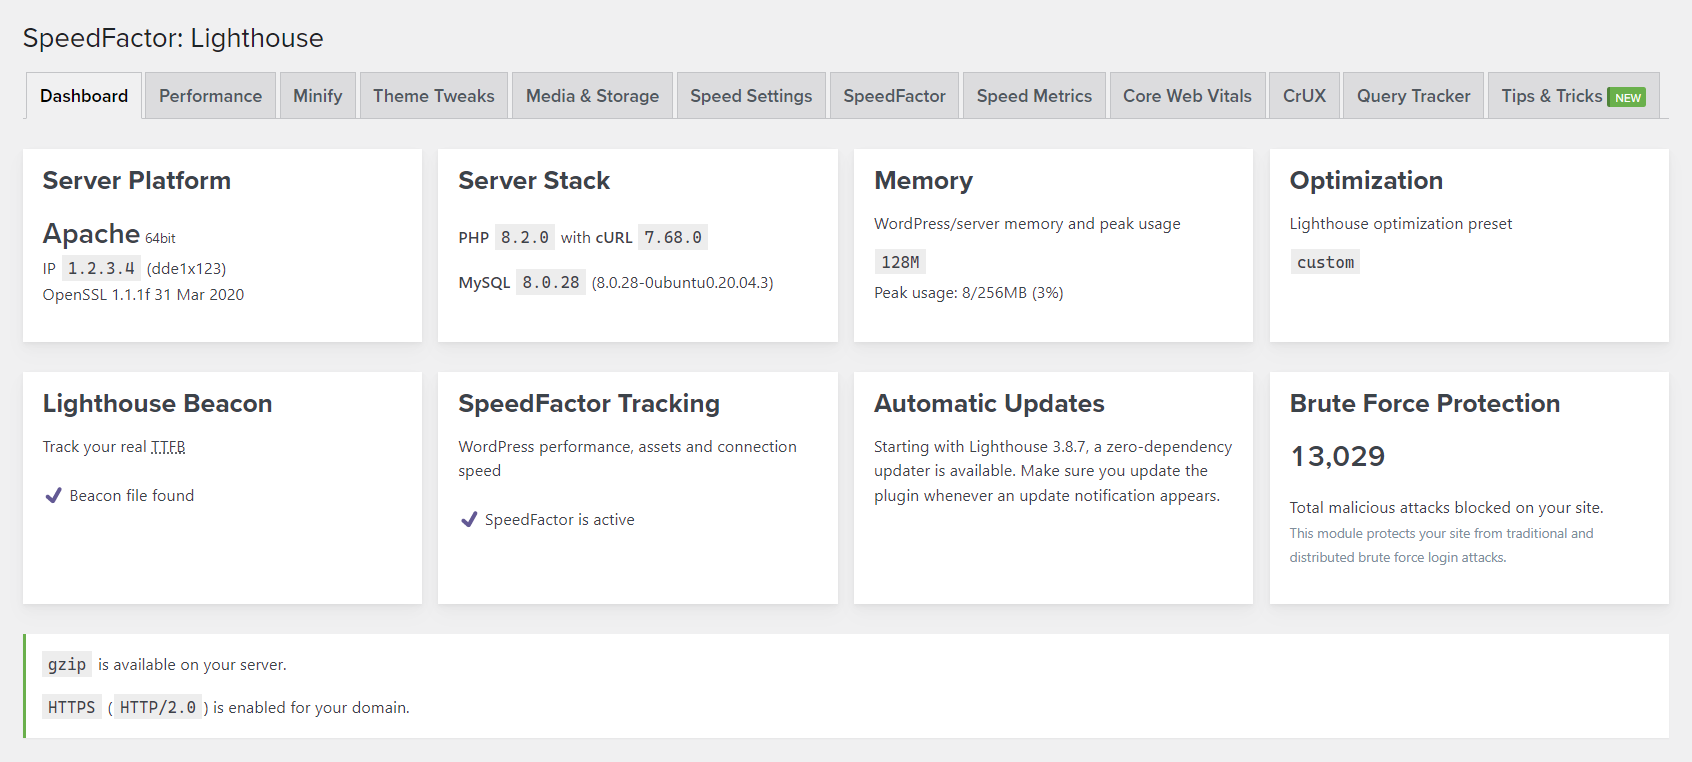
As you install Lighthouse for the first time, you get a dashboard section (Settings → Lighthouse) showing you a summary of your options and your system settings. You also get a list of optimization presets.
By selecting certain options, you can save page requests (prevent unused styles and scripts from loading) and database queries (prevent unused database queries from being performed, thus saving precious loading time). The list continues to show the total number of options you have selected, the total number of recommended options and several cache values, if you decide to enable them (otherwise they stay at zero).
If you are a complete WordPress beginner, I advise using a preset, then navigating through the options and see what each one does. If you can find your way around WordPress or if you’ve read stuff online, I advise you to check each option in the list below, enable them gradually and check the site’s performance. Note that some options will be effective after 5 to 10 minutes.
Keep reading below to see an overview of the available options.
Performance Settings
Zen mode
This option removes most of WordPress-related information, notifications, dashboard meta boxes, widgets, WordPress logos and version details.
It also removes some (mostly) unused taxonomies, such as link categories and post formats, and declutters the admin bar. You can use this option for client sites, where you want to remove the WordPress logo and the avatar function and make the backend looking more white-label.
Performance
This option speeds up internal browsing, as the feature helps detect and preload user clicks. When a user hovers over a link, prerender and/or prefetch hints are dynamically appended to the <head> of the document, but only if those respective hints haven’t already been generated in the past.
Enabling this option will make loading subsequent pages seem instant. However, if users don’t usually click on internal pages, but prefer to only browse and hover links, they will be loaded and never used, increasing the server load. Use it only if needed, and keep an eye on user engagement and bounce rate to see if it has any effect.
Theme Clean-up
Remove version parameter from scripts and stylesheets
This option removes version parameter from scripts and stylesheets URLs in order to help with browser caching.
Disable emojis and smilies
This option disables replacing special characters with emojis and smilies and stops the emoji scripts/styles loading, saving several requests and queries. This option also disables all content parsing (clickable links, smilies conversion, bbCode conversion and other WordPress-specific parsing).
Disable canonical URL redirection
This option disables URL redirection when a page is not found. By default, WordPress redirects a non-existent page to the closest permalink it finds.
Disable author archive
This option disables author archives and helps with search engine indexation, duplicate content and security.
Remove prepend_attachment filter from the_content()
This option removes the prepend_attachment filter from the_content() to fix conflicts with specific page builders.
<head> Clean-up
Clean up theme <head>
This option removes RSD, WLW references, WordPress generator tag and post shortlinks from the theme’s <head> section. It also removes WordPress-generated <rel> tags (search engines do not use them any more). These details are not needed in 90% of the cases.
Hide RSS links
This option removes RSS links and prevents content copying and republishing.
System Clean-up
Disable comment cookies
This option disables the user information – name, email, and website – being saved in a browser cookie. This is usually done to have the details autocompleted in the comment form. Only check this option if you don’t have a comment-heavy site.
Disable WordPress embeds
This option removes embed query variables, disables oEmbed discovery and completely removes the related scripts (disallows WordPress posts to be embedded on remote sites).
Disable mediaelement.js
mediaelement.js is a JavaScript library used by WordPress to provide enhanced media playback functionality, such as video and audio players. When this option is enabled, it will remove the mediaelement.js library from your website if any page functionality does not require it.
There are several reasons why you might want to disable mediaelement.js.
- Reduce page load times: By removing the library from your site, you can decrease the number of files that need to be loaded, thereby improving the site’s performance and reducing page load times.
- Avoid potential conflicts: If you are using a theme or plugin that already includes its own media player,
mediaelement.jsmight cause conflicts and affect the functionality of the other player.
Server Load
Slow down the WordPress heartbeat
The WordPress heartbeat is a feature that allows the WordPress admin interface to communicate with the server in real-time. This feature uses AJAX requests to periodically check for updates, such as post revisions, plugin updates, and user activity. By default, the WordPress heartbeat sends requests every 15 seconds on post edit screens and every minute on dashboard screens.
Enabling the “Slow down the WordPress heartbeat” option will increase the time interval between these requests. This can have several performance benefits:
- Reduced server load: By decreasing the number of requests being sent to the server, you can reduce the load on the server and improve its performance. This is especially important if you have many users or if your server has limited resources.
- Improved user experience: The WordPress heartbeat can sometimes cause slow loading times and unresponsive admin screens, particularly on shared hosting environments or on servers with limited resources. By slowing down the heartbeat, you can improve the user experience by reducing the likelihood of these issues occurring.
- Reduced network traffic: The WordPress heartbeat can generate a significant amount of network traffic, particularly if you have many users or if you are accessing your site over a slow network connection. Slowing down the heartbeat can reduce the amount of network traffic generated by your site, making it faster and more responsive.
It’s worth noting that slowing down the WordPress heartbeat may not be necessary for all sites. If you have a small number of users and a powerful server, you may not see any performance benefits from enabling this option. However, for larger sites or sites with limited resources, enabling this option can be a simple and effective way to improve performance and reduce server load.
Security Settings
Read the official WordPress guidelines for hardening and securing your site.
Basic security
Normalize HTTP(S) scheme
This option forces the use of HTTP/HTTPS based on the active WordPress settings and is useful when switching from HTTP to HTTPS or to minimize mixed content warnings.
Disable XML-RPC
This option disables remote access to your WordPress site (may cause issues with some plugins). Please reconsider the use of plugins which request XML-RPC access.
Enable brute force protection
Enabling brute force protection will prevent bots and hackers from attempting to log in to your website with common username and password combinations
Theme Settings
Theme tweaks
Disable HTML in WordPress comments
This option disables HTML code in WordPress comments. HTML is sometimes used for bold/italic text or links.
Remove Dashicons from front-end for non-administrators
This option removes the Dashicon font from front-end for non-administrators, if the theme doesn’t require Dashicons.
Remove comment reply script (if using a third-party comments plugin)
This option removes the reply script, usually enqueued in <head>, if the theme uses no comment replying or a third-party comments plugin (Disqus, Jetpack, etc).
Widget tweaks
Remove X widget (WP_Widget_X)
These options remove the respective widgets, making the Appearance -> Widgets section faster.
All Performance Settings Explained
Lighthouse’s Performance screen shows all performance-related settings. Some of these will speed up your website, while a combination of some of them, might slow down your website. Let’s break them down below:
Tick the checkboxes to selectively remove/disable WordPress actions and filters. These options will reduce database queries and HTTP(S) requests, making the site lighter. A database query is a request for information from a database. An HTTP(S) request is a browser request for a file.
Check the HTML5 Boilerplate .htaccess rules for further performance and optimisation.
Check the WordPress Native Settings Optimization guide to squeeze even more speed from your WordPress site.
Always follow the in-plugin recommendation badges:
recommended We recommend enabling this optionnot recommended We do not recommend enabling this optionuse with caution Only enable this option if you know what you are doinguse if needed Only enable this option if you need it
Performance Settings
“Thank You” Link
- Add a discrete “Pagespeed Optimization by Lighthouse” link in the footer: Adds a discreet link in the footer of your website crediting Lighthouse for pagespeed optimization. This link can help support the plugin developer and provide visibility for the optimization tool.
Zen Mode
- Zen mode: Removes most of the WordPress-related clutter, notifications, meta boxes, and filters in the Dashboard view. This declutters the WordPress admin area for a more focused user experience.
Performance
- Prerender links: Pre-renders links when a user hovers over them, potentially speeding up page loads by loading linked pages in the background.
- Prerender and prefetch links: Pre-renders and prefetches links when a user hovers over them, loading linked pages in the background and downloading their resources in advance.
Caching
- Enable page caching (browser caching): Enables caching of web pages in the user’s browser, reducing the need to re-download content on subsequent visits.
- Enable ETag header: Adds ETag headers to HTTP responses, allowing browsers to determine whether a cached resource needs to be revalidated with the server.
- Enable Cloudflare-specific caching headers: Adds caching headers specific to Cloudflare, optimizing caching behavior when using Cloudflare CDN.
Theme Clean-up
- Remove version parameter from scripts and stylesheets: Removes the version parameter from URLs of scripts and stylesheets, which can improve browser caching efficiency.
- Disable emojis and smilies: Disables replacing special characters with emojis and smilies in content, reducing unnecessary script and stylesheet requests.
- Disable canonical URL redirection: Disables URL redirection when a page is not found.
- Disable author archive: Disables the author archive page, which can help with search engine indexation, duplicate content, and security.
- Remove
prepend_attachmentfilter fromthe_content(): Removes theprepend_attachmentfilter fromthe_content()function, fixing conflicts with specific page builders.
<head> Clean-up
- Clean up theme
<head>: Removes unnecessary references from the<head>section, such as RSD, WLW references, WordPress generator tag, and post shortlinks. Also removes WordPress-generated<rel>tags. - Hide RSS links: Hides RSS links in the
<head>section, preventing content copying and republishing.
System Clean-up
- Disable comment cookies: Disables saving user information (name, email, website) in the browser when commenting.
- Disable WordPress embeds: Removes embed query vars, disables oEmbed discovery, and completely removes related scripts, disallowing WordPress posts to be embedded on remote sites.
- Disable mediaelement.js: Removes the mediaelement.js script if not required by any page functionality.
Server Load
- Slow down the WordPress heartbeat: Slows down the WordPress heartbeat, which is a periodic AJAX request used for various background tasks.
- Remove Custom Fields metabox from post editor: Removes the Custom Fields metabox from the post editor, improving performance by avoiding a slow
meta_keysort query.
Custom Resource Hints
- Custom Resource Hints (DNS Prefetch): Adds DNS prefetch hints for specified URLs in the
<head>section of the document, improving DNS resolution speed for resources. - Custom Resource Hints (Preconnect): Adds preconnect hints for specified URLs in the
<head>section of the document, establishing early connections to specified hosts to reduce latency.
All Theme Tweaks Settings Explained
Theme Tweaks
- Disable HTML in WordPress comments: This option disables HTML markup in comments on your WordPress site. It helps prevent potential security risks from malicious code injection in comments.
- Remove comment reply script (if using a third-party comment plugin): This removes the JavaScript script responsible for handling comment replies. It’s useful if you’re using a third-party comment plugin that provides its own reply functionality.
- Remove native/core lazy loading (if using a third-party lazy-loading plugin): Disables the native lazy loading of images in WordPress. It’s recommended to use this option if you’re using a third-party lazy-loading plugin to prevent conflicts.
- Remove jetpack.css if not needed: Removes the Jetpack CSS file if you’re not using Jetpack features that require it, helping to reduce unnecessary file requests and improve site performance.
- Remove classic-themes.min.css if not needed (WordPress 6.1+): Removes the CSS file for classic themes introduced in WordPress 6.1 if it’s not needed for your theme, reducing unnecessary stylesheet loading.
User Tweaks
- Remove application passwords feature: Disables the application passwords feature, which allows users to generate application-specific passwords for third-party services to access their WordPress account.
Block Editor Tweaks
- Remove post-formats theme support: Removes support for post formats in your theme. Post formats allow you to apply different styles to different types of posts (e.g., standard, gallery, video), but this feature is now deprecated.
- Remove widgets-block-editor theme support: Removes support for the block-based widget editor. This can be useful if your theme provides its own widget management system.
- Remove responsive-embeds theme support: Disables the automatic embedding of responsive styles for embedded content such as videos, which may be necessary depending on your theme’s design.
- Remove editor-styles theme support: Disables the default styles for the block editor. This may be necessary if your theme provides its own editor styles.
- Remove
wp-block-stylestheme support: Disables the default styles for blocks in the editor. This may be necessary if your theme provides its own block styles. - Remove block-templates theme support: Removes support for block templates, which are predefined layouts of blocks. This can be useful if you don’t want to use block templates in your theme.
- Remove core-block-patterns theme support: Removes support for core block patterns, which are predefined collections of blocks. This can be useful if you want to customize block patterns or don’t want to use them at all.
- Remove WooCommerce theme support: Removes support for WooCommerce functionality in your theme if you’re not using WooCommerce or if you want to handle WooCommerce styles and functionality separately.
Optimization
- Clean up and disable blogging/commenting features: Disables blogging and commenting features, including comments, pingbacks, trackbacks, and removes all trackbacks. Useful for business websites that don’t need these features, improving performance and security.
All Media & Storage Settings Explained
Storage Settings
- Disable big image functionality (RECOMMENDED): Disables the “big image” functionality in WordPress. This prevents WordPress from generating additional image sizes for large images uploaded to the media library, which can save storage space and reduce server load.
- Remove additional image sizes (
medium_large,1536x1536and2048x2048): Removes additional image sizes generated by WordPress. This can further reduce storage space usage by eliminating unnecessary image sizes.
Image Behaviour
- Native Lazy Loading: Determines how lazy loading is handled for images and
<iframe>elements. Enabling this option forces native lazy loading for all content images and<iframe>elements, improving page load times by deferring the loading of off-screen images and content.
Responsive Images (drop-down)
- Leave unchanged (inherit value from theme): Keeps the responsive image behaviour as defined by the theme.
- Force responsive image
srcsetfunctionality: Enforces the use of responsive imagesrcsetfunctionality, ensuring that images are served in appropriate sizes based on the user’s device screen size and resolution. - Remove responsive image
srcsettheme support: Removes support for responsive imagesrcsetfunctionality from the theme. This might be necessary if you’re handling responsive images differently or if your theme already provides its own implementation.
Compression Settings
- JPEG Compression Level (WordPress default is 82): Sets the compression level for JPEG images uploaded to WordPress. Higher compression levels result in smaller file sizes but may reduce image quality. This option allows you to adjust the compression level based on your preferences and the specific requirements of your website.
All SpeedFactor Settings Explained
SpeedFactor Frequency
hourly: Runs the SpeedFactor audit every hour.twicedaily: Runs the SpeedFactor audit twice a day.daily: Runs the SpeedFactor audit once a day.weekly: Runs the SpeedFactor audit once a week.
SpeedFactor Results
- (7, 30, 60, 90, 120): Specifies the number of results (in days or hours) to show in the evolution charts. You can choose to display results for the last 7, 30, 60, 90, or 120 days or hours (if you select “hourly” in the above dropdown, then values will represent hours, otherwise days).
SpeedFactor Audit Settings
- SpeedFactor will fall back to HTTP 1.1 if HTTP 2 can’t be negotiated with the server.
- Use HTTP 2.0 (default, recommended): Prefers to use HTTP/2 for faster and more efficient communication with the server.
- Use HTTP 1.1: Falls back to HTTP/1.1 if HTTP/2 negotiation fails.
- SpeedFactor will use TLS 1.3 or later if your cURL version is equal to or higher than 7.52.0 and OpenSSL was built with TLS 1.3 support.
- Use TLS 1.2 (default): Uses TLS 1.2 for secure communication.
- Use TLS 1.3: Prefers to use TLS 1.3 for enhanced security and performance if the server and cURL support it.
- In some rare cases, the audit will not work with IPv6. Switch to IPv4 to debug.
- Use IPv6 (default, recommended): Uses IPv6 for communication with the server, which is recommended for modern networks.
- Use IPv4: Switches to IPv4 if IPv6 is causing issues with the audit process.
SpeedFactor Notifications
- Allows you to specify an email address to receive notifications whenever an audit runs. This can help you stay informed about any performance issues or improvements.
All Security Settings Explained
Basic Security
Normalize HTTP(S) scheme
- Normalize HTTP(S) scheme: Ensures that the URLs on your website use the same protocol (HTTP or HTTPS) as the current page. This can help avoid mixed content warnings and ensure a consistent browsing experience.
Disable XML-RPC
- Disable XML-RPC: Disables the XML-RPC functionality of WordPress, which can prevent remote access to your site. However, note that some plugins may rely on XML-RPC, so disabling it may cause compatibility issues.
Disallow unauthorized REST requests
- Disallow unauthorized REST requests: Prevents unauthorized users from making requests to the WordPress REST API. This can enhance security, but it may also affect the functionality of some plugins or themes.
Disable user enumeration
- Disable user enumeration: Prevents attackers from easily discovering valid usernames on your site by enumerating through user IDs. However, disabling this feature may cause compatibility issues with some plugins or themes.
Brute Force Protection
Enable brute force protection
- Enable brute force protection: Activates protection against brute force attacks, where bots or hackers attempt to log in to your website using common username and password combinations. Enabling this feature can enhance security by limiting login attempts.
Firewall
Enable firewall
- Enable firewall: Activates a firewall to protect your website from various types of attacks. This feature may include blocking malicious IPs, monitoring traffic, and detecting and blocking suspicious activity.
Registration Spam
Check registration spam
- Check registration spam: Prevents users or bots from registering with disposable or spam email addresses. This helps maintain the integrity of your user database and prevent spam registrations.
Enable Spam Pattern Detection: Periods
- Enable Spam Pattern Detection: Periods: Detects spammers by checking for email addresses with excessive periods, which can be used to evade filters and deceive recipients.
Akismet integration
- Akismet integration: Integrates Akismet, a spam detection service, to protect your website from spam registrations. Akismet analyzes form submissions to identify and block spam.
Maximum number of periods allowed in an email address
- Maximum number of periods allowed in an email address: Sets the maximum number of periods allowed in an email address. Excessive periods can indicate spammy behavior.
Custom error message for blacklisted email addresses
- Custom error message for blacklisted email addresses: Specifies a custom error message to display when a user tries to register with a blacklisted email address. This helps inform users of the reason for registration failure.
Blacklisted Words
- Blacklisted Words: Lists words or domains that, if found in a new registration email or username, will result in the registration being banned. Each word or domain should be listed on a separate line.
Blacklist Providers
- Use external blacklists: Allows you to use external blacklists, such as the official Lighthouse blacklist (4P) or Is Spammy, to automatically ban registrations associated with known spam domains.
All CAPTCHA Settings Explained
Enable CAPTCHA
- Enable CAPTCHA module: Checkbox option to enable or disable the CAPTCHA functionality on your WordPress site. CAPTCHA helps prevent spam and automated bots from submitting forms.
Appearance
- Total number of characters: Dropdown to select the number of characters displayed in the CAPTCHA challenge (3, 4, 5, or 6).
- CAPTCHA letters: Dropdown to select the type of characters used in the CAPTCHA challenge: uppercase, lowercase, or a combination of both.
- CAPTCHA type: Dropdown to select the type of characters used in the CAPTCHA challenge: alphanumeric characters, letters only, or numbers only.
CAPTCHA Display
- Enable for login: Dropdown to select whether to display CAPTCHA for the login form. Options are “Yes” or “No”.
- Enable for registration: Dropdown to select whether to display CAPTCHA for the user registration form. Options are “Yes” or “No”.
- Enable for password recovery: Dropdown to select whether to display CAPTCHA for the password recovery form. Options are “Yes” or “No”.
- Enable for comments: Dropdown to select whether to display CAPTCHA for the comment form. Options are “Yes” or “No”.
- Hide for logged-in users: Dropdown to select whether to hide CAPTCHA for logged-in users. Options are “Yes” or “No”.
WordPress Lighthouse: What is Time to First Byte?
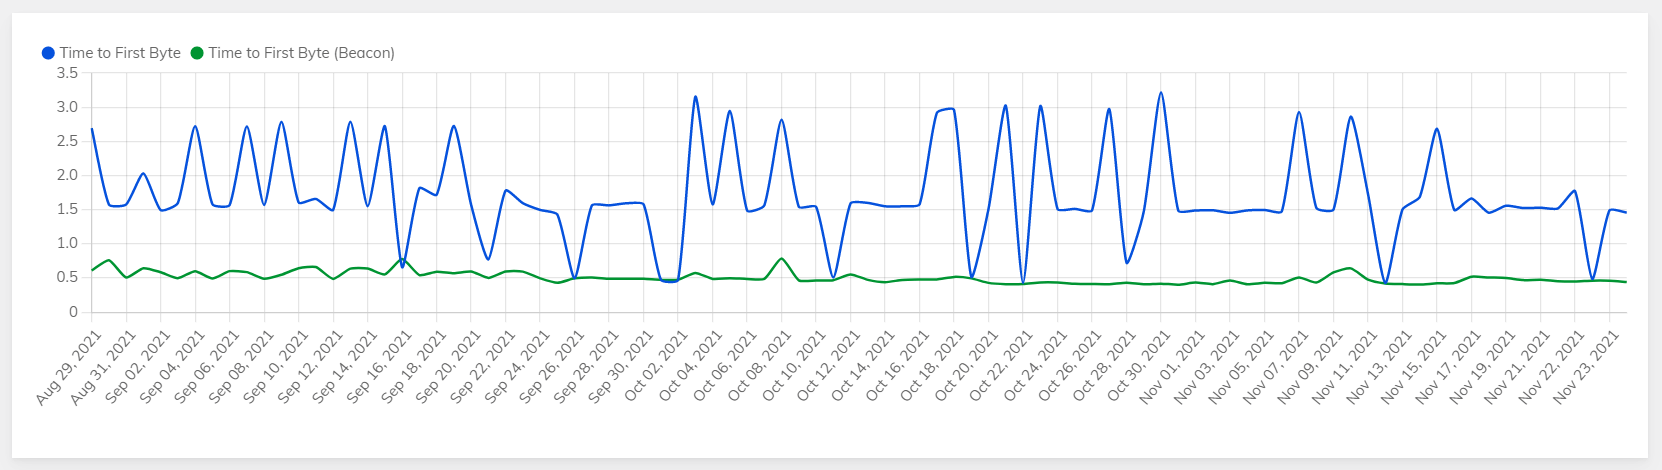
The Time to First Byte metric is measured as the time from the start of navigation request until the time that the client receives the first byte of the response from the server. It includes network setup time (SSL, DNS, TCP) as well as server-side processing.
You can find this metric and its evolution in the Speed Metrics tab of Lighthouse’s plugin settings.
The thresholds for fast/average/slow TTFB are 500 ms as the upper limit for fast TTFB and 1500 ms as the lower limit for slow TTFB.
- fast TTFB <
500 msis based on the server responsiveness best practice. - slow TTFB >=
1500 msis based on the requirement for the fast Largest Contentful Paint (LCP) threshold to be <1800 ms. A server response that exceeds1500 mswill not, in most cases, meet the fast LCP goal.
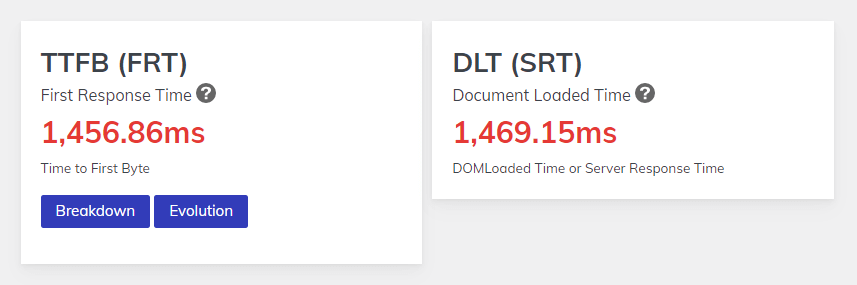
The total time, in seconds, that the full pageload operation lasted, including connection and document return. This does not include any JavaScript, third-party resources or images. Also known as Raw Pageload Time, Time to First Byte (TTFB) or StartTransfer Time.
The TTFB is the total amount of time spent to receive the first byte of the response once it has been requested.
This metric is one of the key indicators of web performance. Google recommends this value to be between 250ms and 500ms.
Lighthouse Performance Tips & Tricks for Your Website
This is an exhaustive list of technical tips and tricks that will help improve your page speed and increase your performance score.
DNS Lookup & Connection
- Check your DNS records and remove any that you don’t need. Use a DNS server, such as Cloudflare, to improve the DNS lookup speed.
TTFB (Time To First Byte)
- Upgrade your server software (Apache, Nginx, Litespeed, IIS) to the latest available version.
- Upgrade your server PHP to the latest available version (8+).
- Upgrade your server database engine (MySQL, MariaDB, Percona, SQLite) to the latest available version.
- Create a static
robots.txtfile to avoid WordPress initializing every time a bot requests it. - Create a static
favicon.icofile to avoid slowdowns every time the browser requests it.
Set up a backup server before taking the steps below.
Response Time, Page Speed & Performance
- Upgrade your WordPress plugins to the latest available version.
- Upgrade your WordPress CMS to the latest available version.
- Upgrade your WordPress theme to the latest available version.
- Do not use a redirection plugin, if possible. Set your redirects server-side, in your
.htaccessfile or your Nginx configuration file. - Make sure your database engine is InnoDB.
- Make sure your database encoding/collation is
utf8mb4. - Increase your WordPress memory constant to 128M+.
- Consider disabling revisions –
WP_POST_REVISIONS. - Consider disabling the trash –
MEDIA_TRASHandEMPTY_TRASH_DAYS.
See code samples inside your Lighthouse plugin → Tips & Tricks tab.
Assets & Resources
- Reduce the number of JavaScript resources – use Google Tag Manager to load all external tracking snippets, analytics and more.
- Optimize your theme to load all JavaScript resources in the footer.
- Reduce the number of JavaScript resources and CSS stylesheets by cleaning up your plugins, refactoring your website’s functionality or finding alternative plugins.
- Reduce the number of JavaScript resources and CSS stylesheets by combining them (either by refactoring your theme/plugins or by programmatically concatenating them).
- Minify your JavaScript resources and CSS stylesheets, either manually or by using Cloudflare.
- Load your custom fonts locally.
- Get rid of all unnecessary font subsets (based on your target audience’s language).
- Get rid of all font versions, except for WOFF2.
- Use resource hints and early hints.
- Use server caching (OPcache, XCache, Varnish, Redis, etc.).
- Use a caching plugin.
Prefetching
Because dns-prefetch resolves only the domain name but doesn’t preconnect to the remote server or preload the resource, it requires little bandwidth. However, it can significantly improve DNS latency — the total request-response time between the DNS server and the user’s browser.
You’ll only need to use dns-prefetch when the resource is hosted on a different domain, since you don’t need to resolve your own domain name. dns-prefetch is typically recommended when prefetching domain names for: web fonts, such as Google Fonts or custom CDN fonts, analytics scripts, scripts coming from third-party resources, social media widgets or any widget that loads third-party content via the <script> tag, resources hosted on a CDN.
Preconnecting
For the most part, you can use the preconnect resource hint for the same things as dns-prefetch. You should choose it only if you are sure the user will request the script, font, stylesheet, or other resource from the third-party server.
Since preconnect exchanges more data, it also needs more bandwidth. So you have to be more careful with it to avoid slowing down the page and wasting your user’s bandwidth with redundant data.
Be careful to not add too many resource hints, as they could quite easily negatively impact performance, especially on mobile.
Check the Using Resource Hints to Optimize WordPress Performance guide.
Content
- Get rid of your current page builder or reconsider its usability. Use the native WordPress block editor instead.
- Make sure all your images are lazy loaded.
- Replace your vector images and/or icons with inline SVG.
- Resize and compress your JPEG images.
- Use a third-party service (not a plugin) to optimize your images before uploading them.
- Remove (or disable) your lazy-loading plugin (or script). Modern browsers now include native lazy-loading.
- Check the WordPress Native Settings Optimization guide to squeeze even more speed from your WordPress site.
Error Logging
Stay on top of errors, warnings, and notices as they occur.
See all errors, warnings, and notices in a file generally called debug.log in wp-content folder. If Apache does not have write permissions, you may need to create the file first and set the appropriate permissions (e.g. 0666).
In order for errors to be logged, you need to edit your wp-config.php file.
See code samples inside your Lighthouse plugin → Tips & Tricks tab.
Find your error log (in document root or in wp-content directory):
Example #1: /home/user/example.com/debug.log
Example #2: /home/user/example.com/wp-content/debug.log
Other
The suggestions below might not apply to your website.
- Remove Google Analytics and replace it with a lighter solution, such as Active Analytics.
- Remove Google reCAPTCHA and replace it with Akismet or a lighter solution.