Table of Contents
Breaking Changes
Version 8.1.5 changes the category taxonomy name from imagepress_image_category to image-category. After updating to 8.1.5, go to ImagePress Settings -> Dashboard to migrate to the new taxonomy name. No action is required on your part, just visit the Dashboard and you are all set. If required, regenerate (re-save) your Permalinks.
Installation
ImagePress requires WordPress 4.9 or higher in order to function as intended. We recommend the latest version of WordPress. In addition to this, PHP 7+ is required for certain functions and modules. Check with your host before attempting to install ImagePress.
Minimum requirements
✅ WordPress 4.9+
✅ PHP 7+
Recommended requirements
✅ WordPress 6.0+
✅ PHP 8+
Optimal requirements
✅ WordPress 6.7+
✅ PHP 8.4+
Additional Links
How to build a simple photo contest website with WordPress and ImagePress
In addition to the requirements above, ImagePress requires the Permalinks structure to have the post name (/%postname%/) in its structure. It will still work without it, but some features might not be available.
- Upload the
/imagepress/folder to your/wp-content/plugins/directory - Activate the plugin via the Plugins menu in WordPress
- A new ImagePress menu will appear in the WordPress menu area
ImagePress works out of the box, but because of its complexity, some settings, and options need to be set beforehand. Note that some features require the block editor to be available, and they won’t work with custom page builders.
Basic Installation
1. Create a gallery page by using the [[imagepress-loop filters="yes"]] shortcode.
2. Create an image/photo upload page by using the [[imagepress-add]] shortcode.
That’s it! You have a basic ImagePress installation up and working.
Head over to ImagePress → ImagePress Settings in your Dashboard menu and check the Settings and Configurator tabs for design related changes and settings.
Template Files for Images (optional)
ImagePress is designed to work right out of the box with most WordPress themes. It does this by using a template hierarchy system in the same way WordPress does. When you create a new image in ImagePress and view the front-end page, chances are it will display just like a single blog post in your theme. That’s because ImagePress will use the single.php template file in your theme to display the image page. For many themes, that is perfectly fine. For others, not so much. The good news is you’re not stuck with it. You can create a template file used only by ImagePress single images.
ImagePress only uses the single.php template because it can’t find the one it’s looking for: single-image.php. If that template file exists, ImagePress will use it to display single images instead of the template for blog posts.
To create your single-image.php template, copy the single.php or singular.php file from the root of your parent them into the root of your active (child) theme. Then rename the file single-image.php.
Inside this function, remove the the_content() function and replace it with the ImagePress code:
<?php
if ( function_exists( 'ip_main_return' ) ) {
    echo ip_main_return( get_the_ID() );
}
?>
The single-image.php allows you to have a customized image template, with custom links and fields. An example template is provided inside the /documentation/ folder. ImagePress will notify you if the template exists in the Installation tab, inside ImagePress options. Note that -image is the actual image post slug, so if your image post slug is photo, you should have a single-photo.php template file.
Note: This template is now in use for your single image pages. To confirm, make a small edit to that file, save, and view an image page on the frontend of your site to see the change.
Template Parts
It’s very possible that your WordPress theme uses the get_template_part() function inside of template files for better file organization. This function allows theme developers to take a portion of a template file and place it in another file.
If the single.php file you copied uses get_template_part() to remove part of the single post HTML into another file, your new single-image.php file will do the same. Use the parameters in the function to find which file holds this HTML.
For example, get_template_part( 'content', 'single' ) refers to content-single.php.
The code in this file (typically just the HTML, not the opening PHP tag at the top of the file) can be copied and pasted in place of the <?php get_template_part(); ?> call from your single-image.php file. That way, you have all the template to play with as you design your single image page.
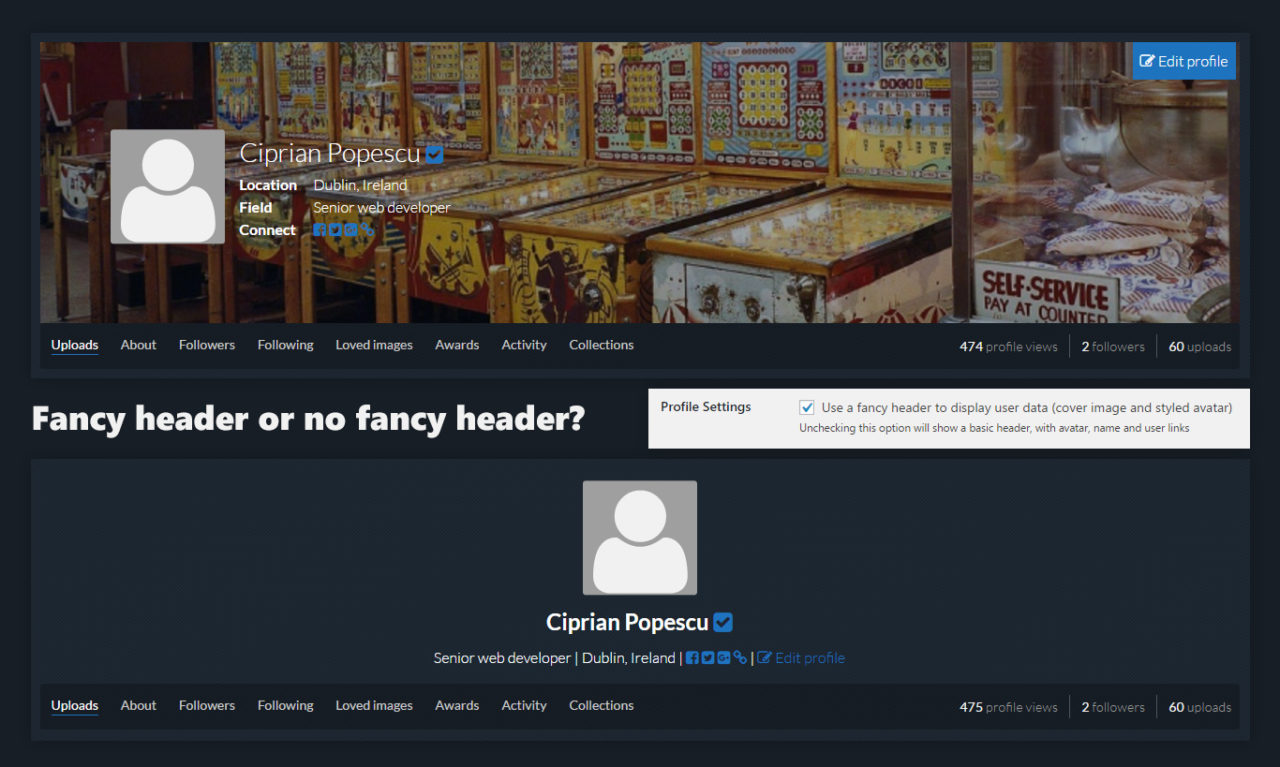
Profile Settings
Switch between a fancy user profile header (cover photo + avatar + various information) and a basic one. See the screenshot below for an example:
Uploading Images
Users can upload images using a variety of permissions:
- As registered users (they also get a profile page)
- As anonymous users (they do not get a profile page, they only get an identifier and an email address)
- All images get assigned to a global (predefined) user
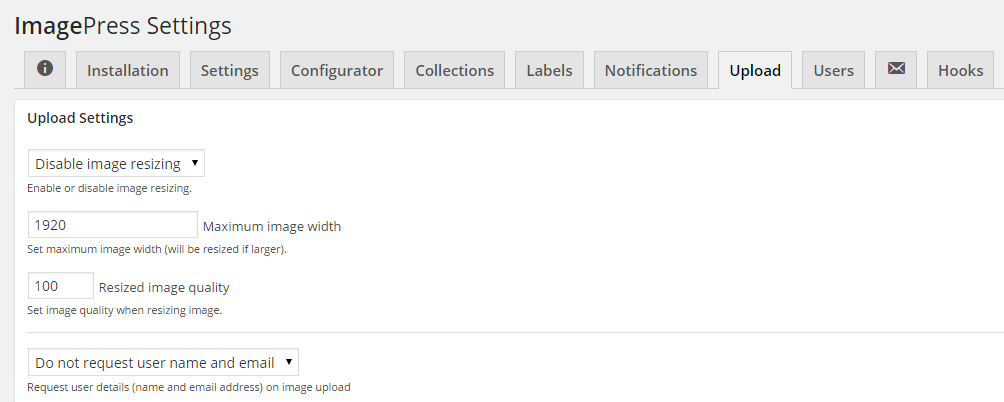
Find all these option in ImagePress Settings -> Upload tab.
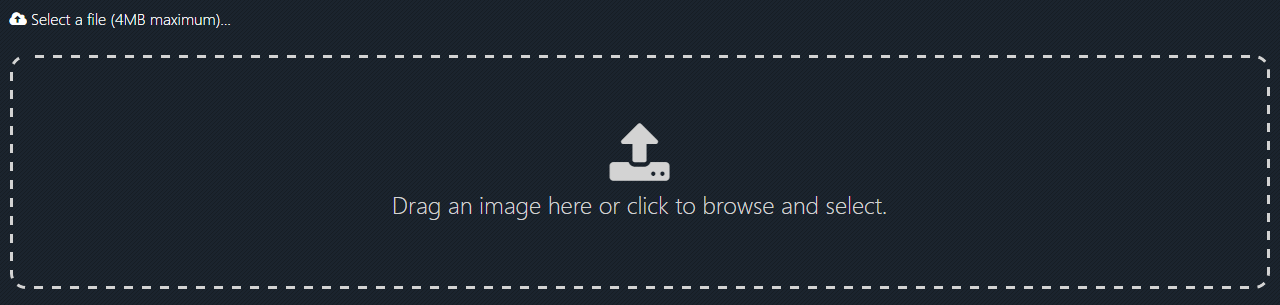
Uploading images is done optionally via drag and drop. Drag and drop upload requires a modern browser and a switch inside ImagePress Settings → Upload tab.
When using the [[imagepress-add]] shortcode in Divi:
- Use the “Text” module instead of the “Shortcode” module
- Make sure the page has a proper permalink structure
- If issues persist, try using the “Code” module instead
If you experience issues with duplicate posts:
- Clear your browser cache
- Try using a different browser
- Make sure you’re not using any form submission plugins that might interfere
- Check if you have any caching plugins that might be causing issues
Anonymous Image Uploading
Use the steps below to enable the name and email address for unregistered users, allowing anonymous upload (not recommended).
Collections
Collections are used to group two or more (unlimited) images and display them on the user profile page, a dedicated page or, using a shortcode, any page.
Use this shortcode to add it on any page:
[[imagepress-collections count="4"]]
Use this PHP code to add it as a shortcode:
<?php echo do_shortcode( '[[imagepress-collections count="4"]]' ); ?>
Or add this code directly in your theme:
<?php
// Collections button (optional, can be placed in the sidebar)
if ( function_exists( 'ip_frontend_add_collection' ) ) {
    ip_frontend_add_collection( get_the_ID() );
}
Note: In order to view collection images, you need to create a viewer page, which should contain the collections shortcode: [[imagepress-collection collection="1"]].
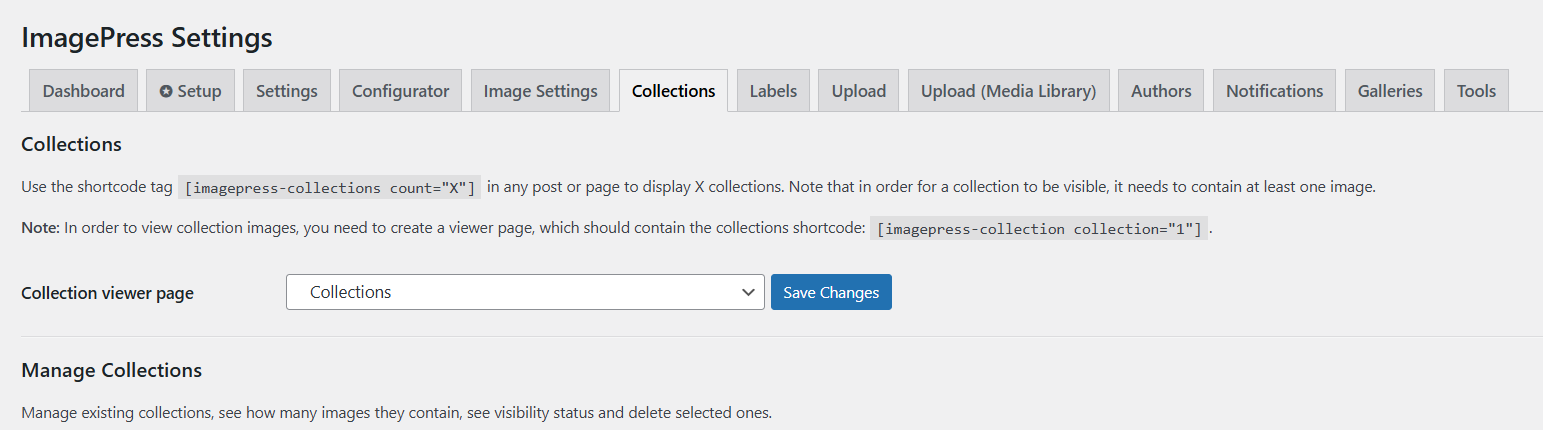
In order for collections to be visible on any page, they need to have four or more images inside. Collections can be public or private. Private collections are only visible to their author, inside the profile editor.
Image Editing
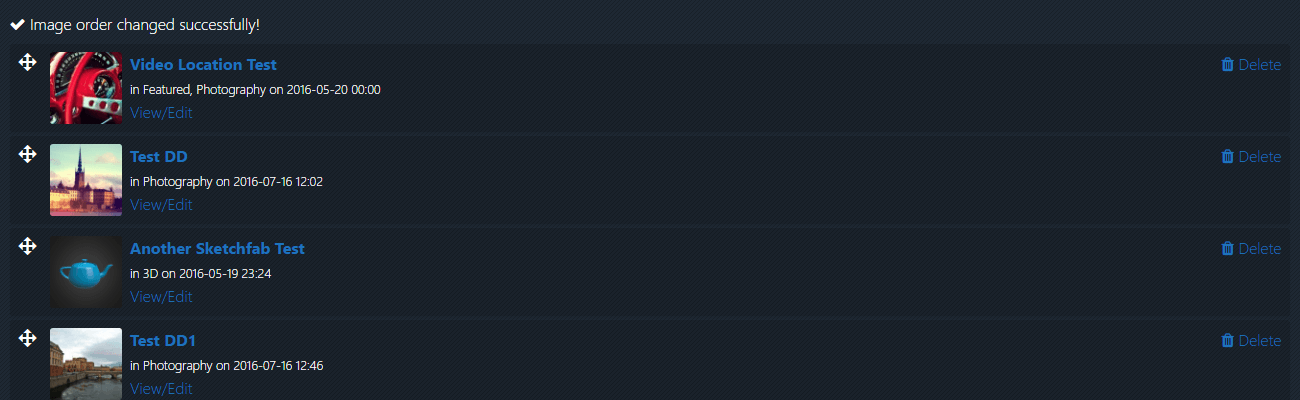
Image reordering and removal is accessible from the profile editor, the last tab (with a cog icon).
Shortcodes
All the shortcodes and their explanation can be found on the Dashboard tab of your ImagePress plugin. Other undocumented shortcodes can be found below.
[[imagepress type="top"]]
This shortcode displays the most popular image, based on views and votes.
[[imagepress mode="likes" count="5"]]
This shortcode displays the titles of the most liked/voted images.
[[imagepress mode="views" count="5"]]
This shortcode displays the titles of the most viewed/visited images.
[[imagepress mode="rand"]]
This shortcode displays a random image.
Tutorials
Note that some tutorials may use old/deprecated code. We try to maintain all tutorials up to date, but feel free to contact us if something doesn’t work.
Note: Noir UI is no more. You can still find it on GitHub, but it’s free and it will soon be outdated.

ImagePress – How to create a taxonomy template
If you are not using Noir UI theme, you can easily create a taxonomy page for any theme and view the image archive/category using the ImagePress grid.
Add a file called taxonomy-image-category.php inside your theme’s root directory and add the code below. Make sure you match your theme’s design (e.g. in the example below, we have <div class="container content">, but maybe your theme has a different structure).
<?php
/**
* ImagePress taxonomy template
*
* Taxonomy template with queried parameter as shortcode argument.
*
* @package ImagePress
* @subpackage Template
*/
?>

<?php get_header(); ?>

<div class="container">
    <h1><?php echo get_queried_object()->name; ?></h1>

    <div class="wrap-content-inner">

        <?php
        $paged = ( isset($_GET['page']) ) ? intval($_GET['page']) : 1;

        // Get taxonomy term from WordPress query
        $ip_taxonomy_term = sanitize_title( get_queried_object()->name );

        // Display shortcode based on queried taxonomy term
        echo do_shortcode( '[imagepress-loop category="' . $ip_taxonomy_term . '" page="' . $paged . '"]' );
        ?>

    </div>
</div>

<?php
get_footer();
Note that you might need to make some changes in order to accommodate your theme’s structure.
ImagePress – How to customize your single image template
ImagePress – How to create a notifications section
If you are not using our Noir UI theme, you can easily create an ImagePress notifications section for any theme.
If you want to create a separate page for the notifications, use the [[notifications]] shortcode. If you want to create a dynamic menu item, use the ip_notifications_menu_item() template function.
If you are using a custom menu in your theme, use the following code:
<?php if (is_user_logged_in()) { ?>
    <div class="bell-pepper"><?php echo ip_notifications_menu_item(); ?></div>
<?php } ?>
You can style the notifications number and the bell as you see fit. Here’s some CSS help:
.notifications-bell {
    padding: 0 12px;
    font-size: 20px;
}

.bell-pepper {
    display: inline-block;
    position: relative;
}

.bell-pepper .notifications-container {
    right: 0;
}

.notifications-bell:hover {
    color: #E58652;
    background: none;
    box-shadow: none;
}

.notifications-bell:hover i {
    color: #E58652;
}

.notifications-bell:hover sup {
    background-color: #ffffff;
    color: #E58652;
}

.notifications-container a {
    color: #E58652;
    background: none;
}

.notifications-container a:hover {
    color: #ffffff;
    background: none;
}
ImagePress – How to create a member directory
List your members (with published images) using the [[imagepress-member-directory]] shortcode.
ImagePress Lightbox
ImagePress Lightbox is an ImagePress add-on which allows images to automatically open into a responsive lightbox. No configuration required.
- Minimal and lightweight, no dependencies required.
- Keyboard arrow keys to navigate and escape to close.
- Swipe gestures supported on touch devices.
- Spread/pinch to zoom in/out supported on touch devices.
- MouseWheel for next/prev images.
- Ctrl+MouseWheel to zoom in/out.
- SVG Icons.
- Native CSS transitions.
- Light and dark themes.
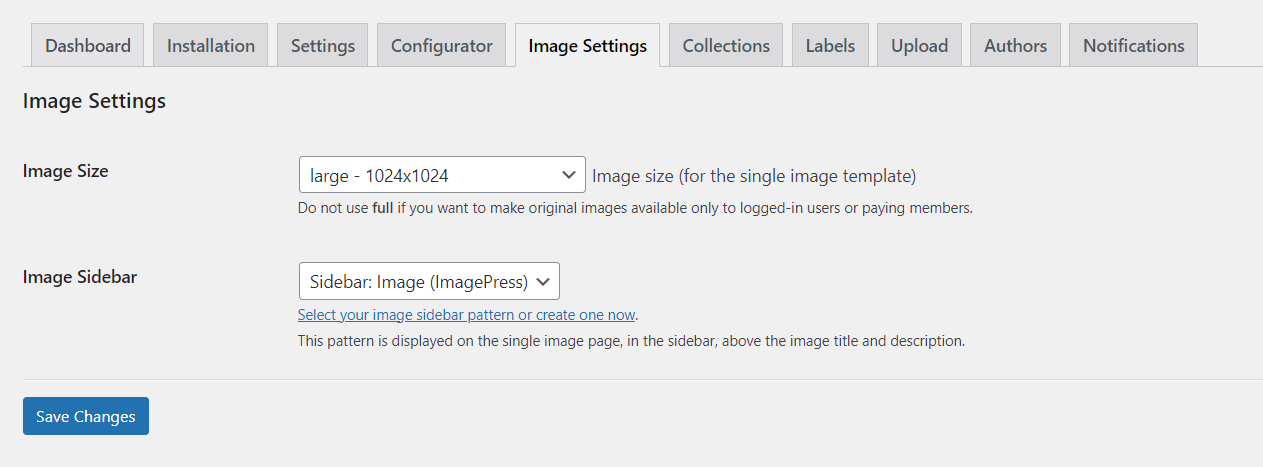
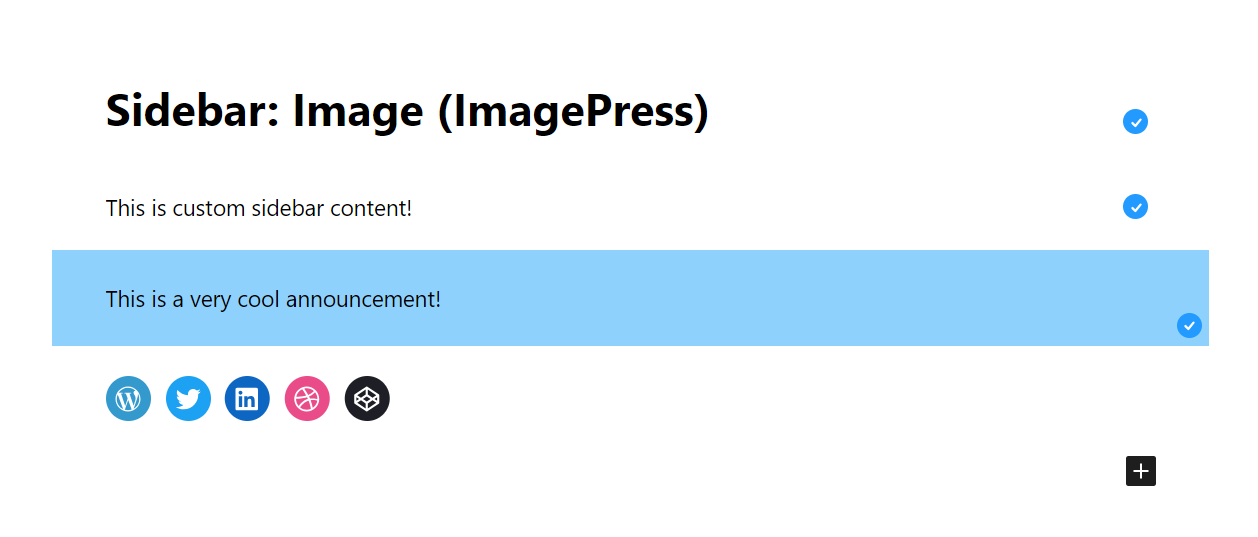
How to add content to the single image sidebar
WordPress has a new feature called Patterns (formerly known as Reusable Blocks). Using this feature, we can add content to the image page sidebar, such as sharing icons, tutorials, announcements and so on.
First, create a new pattern. Second, assign the pattern in ImagePress Settings → Image Settings:
My sidebar could look like this:
How to Create an Anonymous, Non-Moderated Multi-User Image Gallery
ImagePress allows you to create a seamless, open image gallery where users can upload images without registration or moderation. Follow this step-by-step guide to configure your settings for an anonymous, non-moderated multi-user image gallery.
Step 1: Access ImagePress Settings
- Log in to your WordPress dashboard.
- Navigate to ImagePress → ImagePress Settings.
Step 2: Disable Image Moderation
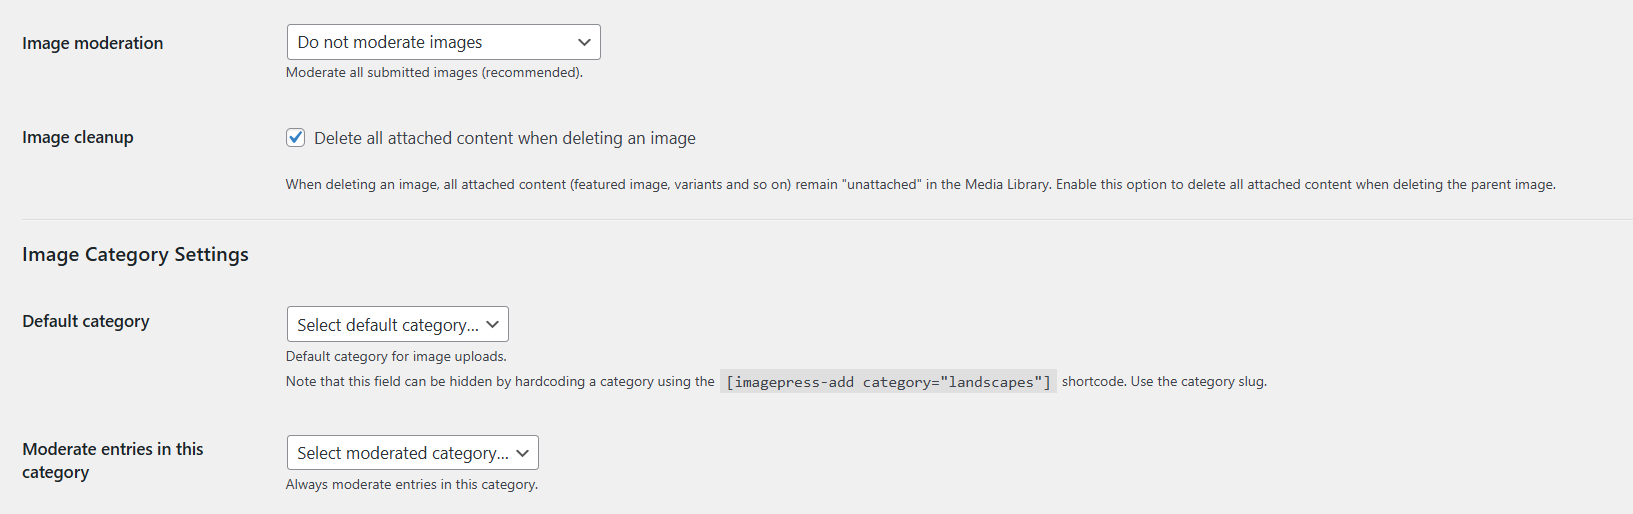
- Click on the Settings tab.
- Locate the Image Moderation dropdown.
- Set it to Do not moderate images. Note: This setting allows all uploaded images to be published immediately without review, which may increase the risk of spam.
Step 3: Set a Default Category (Optional)
- If you want all images to be assigned to a specific category:
- Select a default category from the dropdown.
- This will automatically categorize all uploaded images without requiring user input.
- To hide the category dropdown and force a specific category, use the
[[imagepress-add category="landscapes"]]shortcode in your upload form. Replacelandscapeswith the category slug of your choice.
Step 4: Allow Anonymous Uploads
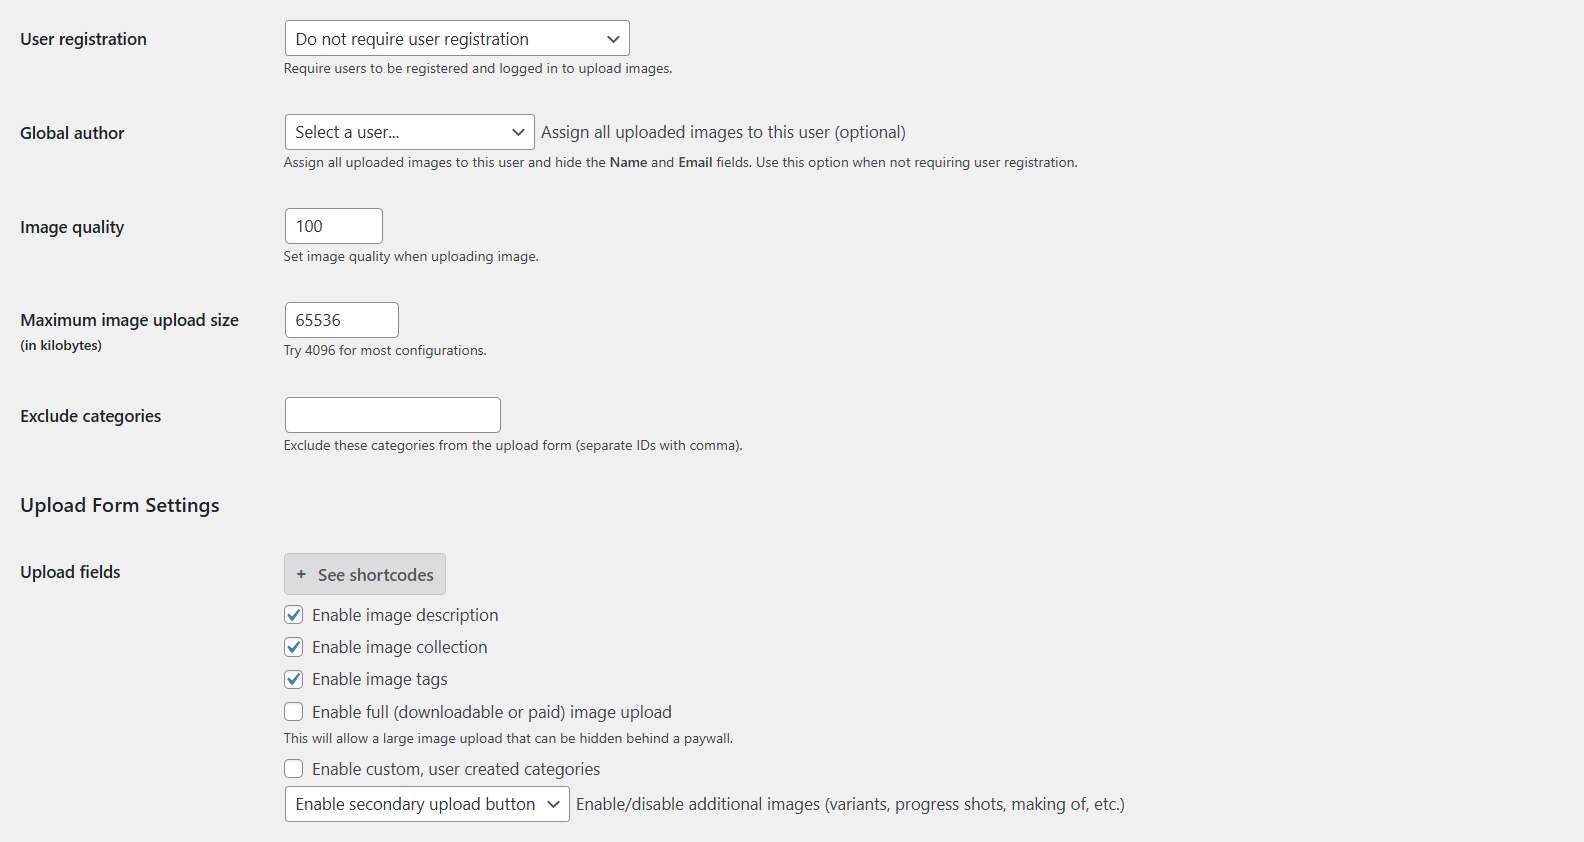
- Click on the Upload tab.
- Locate the User Registration dropdown.
- Set it to Do not require user registration. Note: This will enable anonymous uploads, but it may also lead to spam submissions.
- Ensure the Global Author dropdown has no user selected. Important: If a user is selected in this dropdown, all uploaded images will be assigned to that user, and the Name and Email fields will be hidden from the upload form.
Step 5: Configure Upload Fields
- Choose the fields you want users to fill out when uploading images.
- Available options include:
- Description
- Collection
- Tags
- High-Resolution Image
- Secondary Uploads
How to configure your ImagePress grid
The ImagePress grid is the main view of your gallery. The plugin offers in-depth customization of both the grid and the image cards.
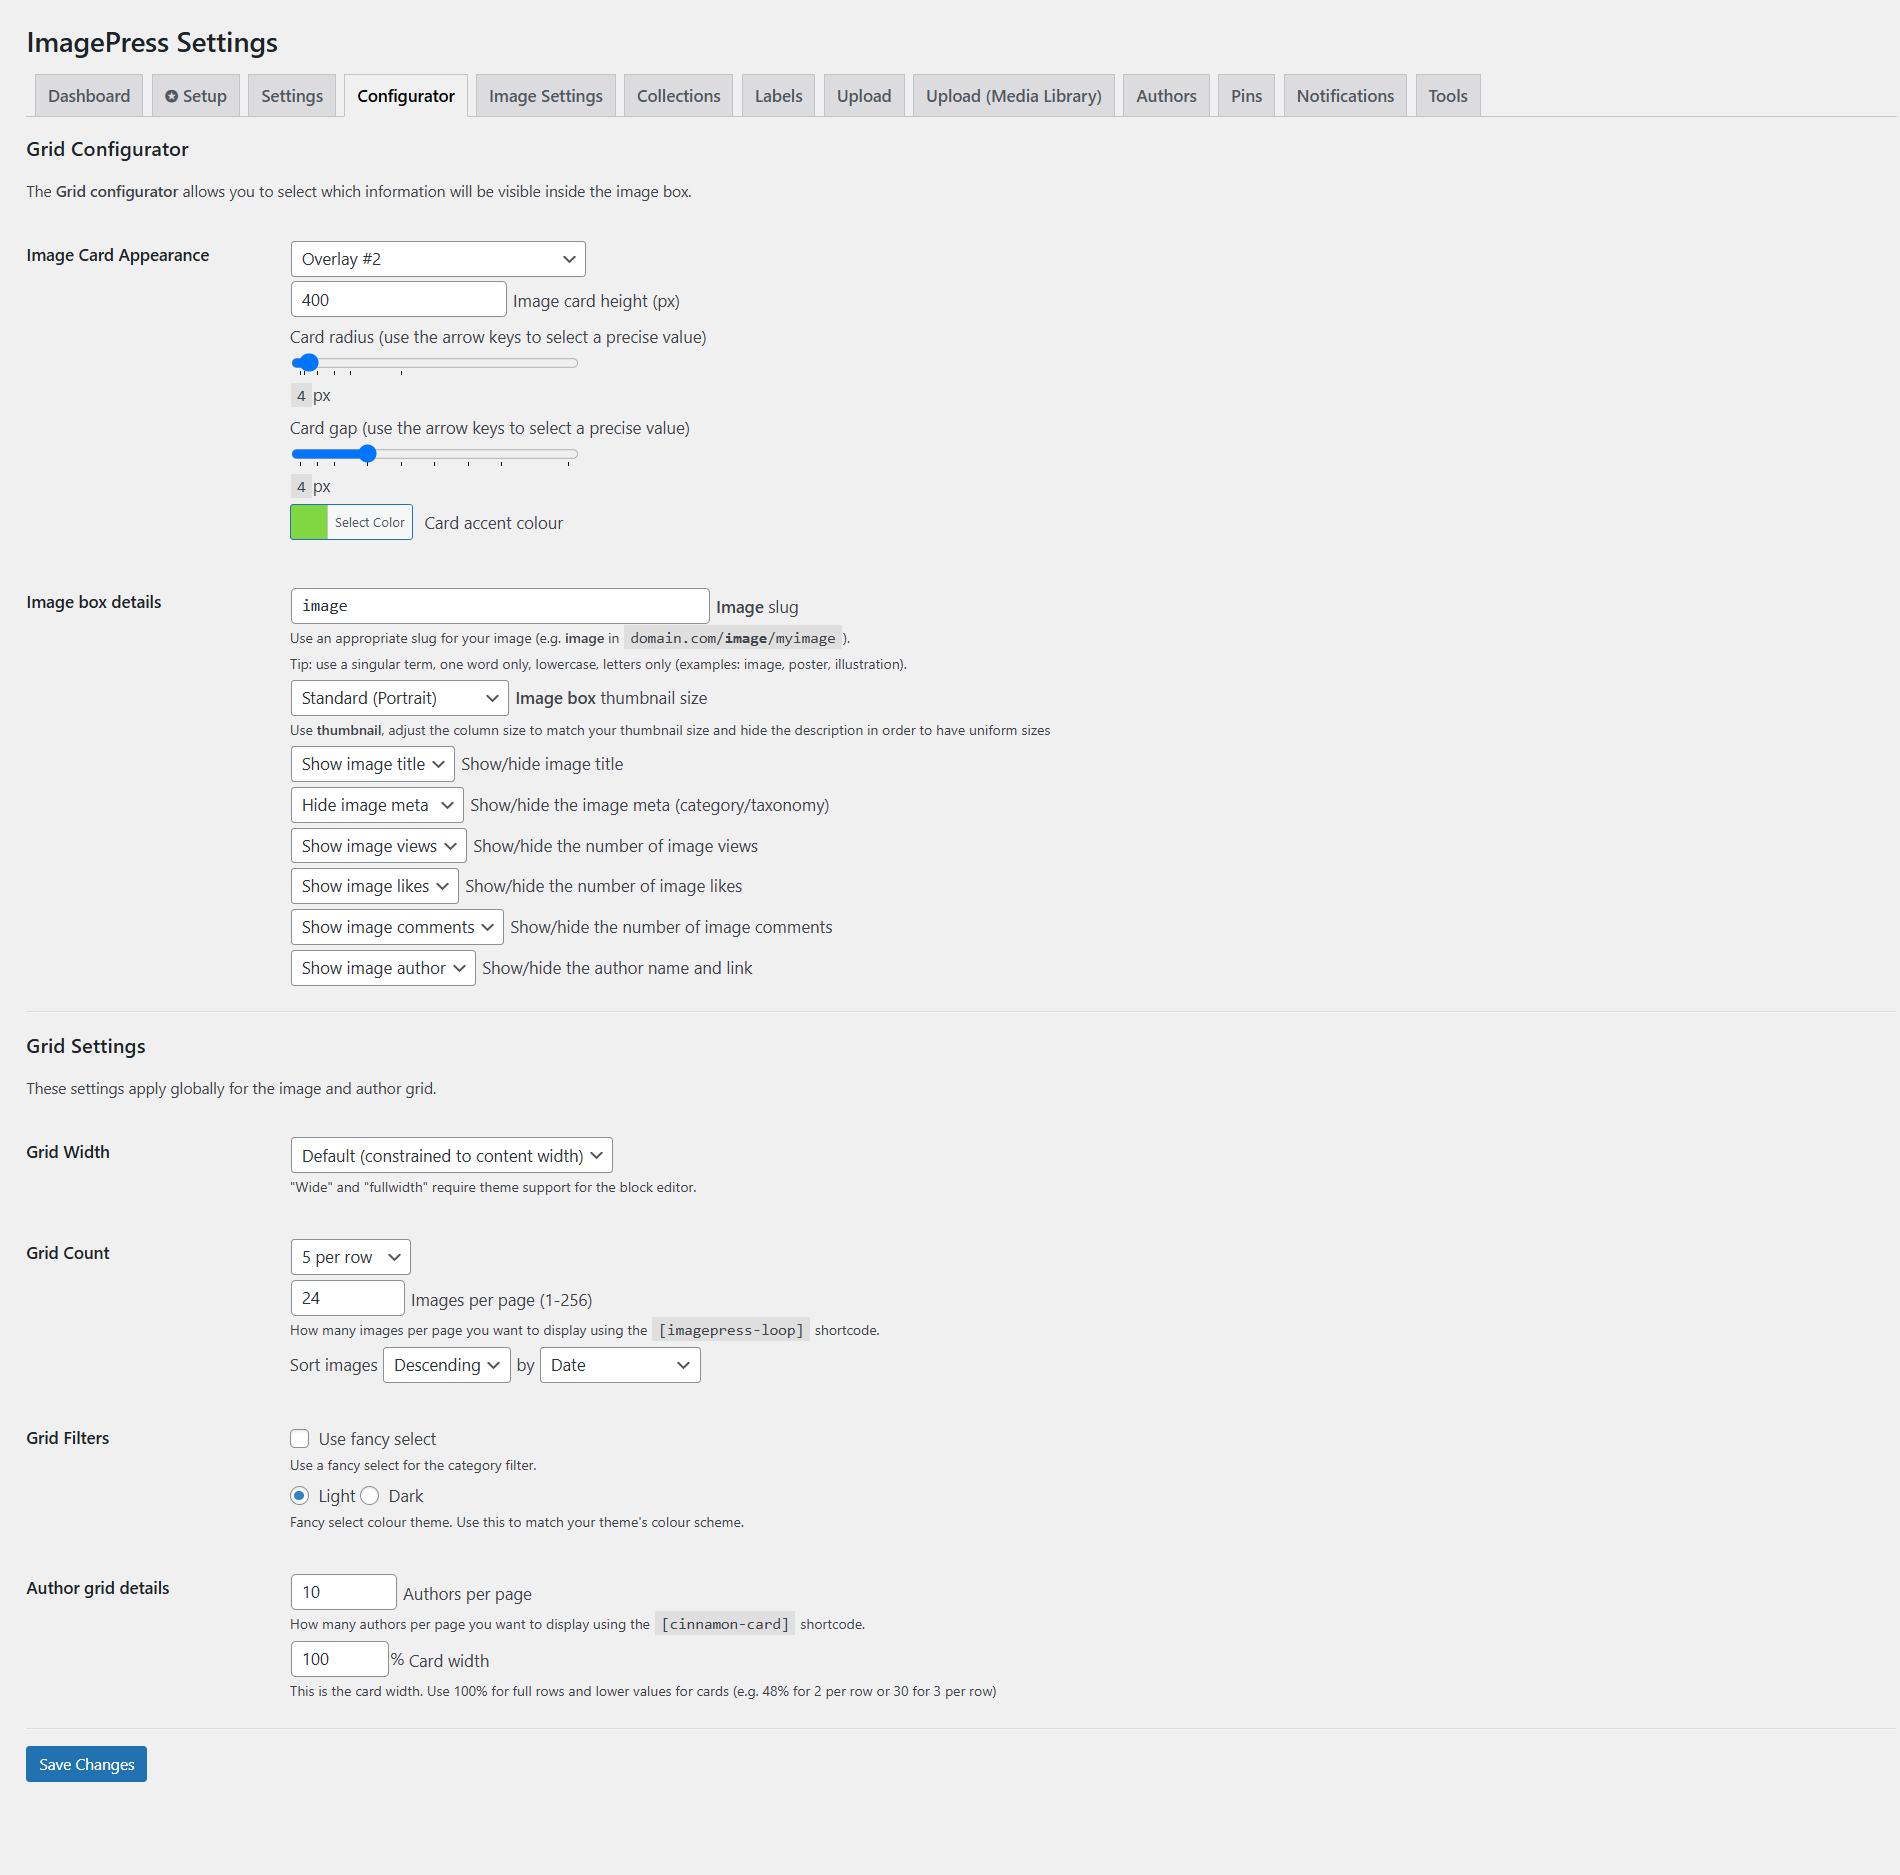
You can configure your image card as Clear, Default, Modern (uses accent colour), Overlay #1, Overlay #2, Overlay #3 (uses dominant colour), Overlay #4 (uses accent colour), Arrow, Windsor, Slide Film, Art Gallery. Pick whichever option suits your design needs.
Next, you can configure your image grid using configurable gaps, border radius and images per row.
Scroll down for more settings, the grid details. All the settings are self-explanatory.
Finally, show your image gallery by using the dedicated shortcode:
[[imagepress-loop filters="yes"]]
How to configure your uploader for best results
From a marketing point of view, you should keep the uploader as simple as possible.
If you have already created a page and added the [[imagepress-add]] shortcode, then head over to ImagePress Settings -> Upload and set it up accordingly.
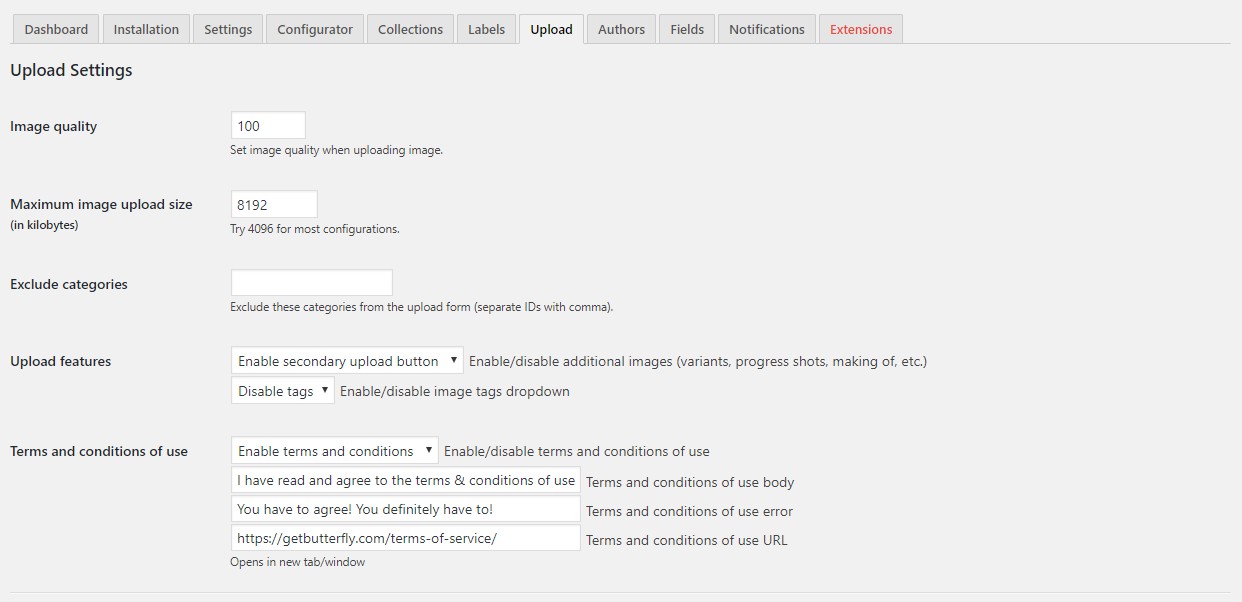
If you want to keep a close eye on your disk space, set image quality between 80 and 90. Depending on what images your users are going to upload, go with 8Mb or 16Mb (8192 or 16384).
In most cases you won’t need secondary uploads, but if you need them, know that all secondary images will be attached to the image post type and displayed in a sequence, below the content.
How to customize your single image template
Lots of users requested a tutorial on how to customize the sidebar to look like the one on Poster Spy. The sidebar uses ImagePress specific code and should be compatible with any theme. If not, add a comment below.
In your single-image.php template replace <?php get_sidebar(); ?> (or add if it does not exist) with <?php get_sidebar('hub'); ?>.
In your theme folder, create a new sidebar template, name it sidebar-hub.php and add the following code:
<aside id="sidebar" role="complementary">
<?php
global $post;
$post_thumbnail_id = get_post_thumbnail_id(get_the_ID());
$author_id = $post->post_author;
$filesize = filesize(get_attached_file($post_thumbnail_id)) / 1024;
$filesize = number_format($filesize, 2, '.', ' ');
$filesize .= ' KB';
?>
<div class="widget-container widget_text">
<nav id="nav-below" class="navigation" role="navigation">
<ul>
<li><?php previous_post_link('%link', '<i class="fa fa-fw fa-chevron-left"></i>'); ?></li>
<li><a href="<?php echo home_url(); ?>/"><i class="fa fa-th"></i></a></li>
<li><?php next_post_link('%link', '<i class="fa fa-fw fa-chevron-right"></i>'); ?></li>
</ul>
</nav>
<?php echo ipGetPostLikeLink(get_the_ID()); ?>
<br>
<?php imagepress_get_like_users(get_the_ID()); ?>
<h3 class="widget-title"><i class="fa fa-file-text-o"></i> Image Details</h3>
<div class="textwidget">
<div>©<?php echo date('Y'); ?> <?php the_author_posts_link(); ?></div>
<br>
<div><b>Image size:</b> <?php echo $filesize; ?></div>
<div><b>Date uploaded:</b> <?php echo human_time_diff(get_the_time('U'), current_time('timestamp')) . ' ago'; ?> (<?php the_time(get_option('date_format')); ?>)</div>
<div><b>Category:</b> <?php echo ip_get_the_term_list(get_the_ID(), 'imagepress_image_category', '', ', ', '', array()); ?></div>
<div><b>Status:</b> <?php echo get_the_term_list(get_the_ID(), 'imagepress_image_tag', '', ', ', ''); ?></div>
<?php if(get_post_meta($i, 'imagepress_print', true) == 1) { ?>
<div><i class="fa fa-print"></i> Print available, contact artist for more info</div>
<?php } ?>
</div>
<h3 class="widget-title"><i class="fa fa-pie-chart"></i> Image Stats</h3>
<div class="textwidget">
<div><b>Views:</b> <?php echo ip_getPostViews(get_the_ID()); ?></div>
<div><b>Comments:</b> <?php echo get_comments_number(get_the_ID()); ?></div>
<div><b>Liked by:</b> <?php echo imagepress_get_like_count(get_the_ID()); ?></div>
</div>
<?php
$hub_user_info = get_userdata($author_id);
if(get_post_meta(get_the_ID(), 'imagepress_behance', true) != '' || get_post_meta(get_the_ID(), 'imagepress_purchase', true) != '') {
echo '<h3 class="widget-title"><i class="fa fa-external-link-square"></i> External Links</h3>';
echo '<p>';
}
if(get_post_meta(get_the_ID(), 'imagepress_behance', true) != '')
echo '<a href="' . get_post_meta(get_the_ID(), 'imagepress_behance', true) . '" class="button noir-secondary" target="_blank" rel="external"><i class="fa fa-behance-square"></i> View Behance Project</a>';
if(get_post_meta(get_the_ID(), 'imagepress_purchase', true) != '')
echo '<a href="' . get_post_meta(get_the_ID(), 'imagepress_purchase', true) . '" class="button noir-success" target="_blank" rel="external"><i class="fa fa-shopping-cart"></i> Purchase Print</a>';
if(get_post_meta(get_the_ID(), 'imagepress_behance', true) != '' || get_post_meta(get_the_ID(), 'imagepress_purchase', true) != '') {
echo '</p>';
}
?>
<?php if(get_imagepress_option('ip_mod_collections') == 1) { ?>
<h3 class="widget-title"><i class="fa fa-folder"></i> Collections</h3>
<?php ip_frontend_view_image_collection(get_the_ID()); ?>
<?php ip_frontend_add_collection(get_the_ID()); ?>
<?php } ?>
</div>
<div class="widget-container widget_text">
<h3 class="widget-title"><i class="fa fa-tags"></i> Related Images</h3>
<div class="textwidget">
<p><i class="fa fa-user"></i> More posters by the same author (<a href="<?php echo get_author_posts_url($post->post_author); ?>">view all</a>)</p>
<?php echo cinnamon_get_related_author_posts($post->post_author); ?>
<p><i class="fa fa-picture-o"></i> More images from the gallery (<a href="<?php echo home_url(); ?>/">view all</a>)</p>
<?php
$cinnamon_post_type = get_imagepress_option('ip_slug');
$authors_posts = get_posts(array(
'posts_per_page' => 9,
'post_type' => $cinnamon_post_type
));
$output = '';
if($authors_posts) {
echo '<div class="cinnamon-grid"><ul>';
foreach($authors_posts as $authors_post) {
echo '<li><a href="' . get_permalink($authors_post->ID) . '">' . get_the_post_thumbnail($authors_post->ID, 'thumbnail') . '</a></li>';
}
echo '</ul></div>';
}
?>
</div>
</div>
</aside>That’s all. Styling is up to you, but the HTML structure should work out of the box.
How to manage your ImagePress account
ImagePress users have access to several features and settings for their accounts. Accounts are reachable either from the profile page or from a hardcoded link.
<?php if (!is_user_logged_in()) { ?>
    <ul>
        <li><a href="<?php echo get_imagepress_option('cinnamon_account_page'); ?>">Log in</a></li>
    </ul>
<?php } else if (is_user_logged_in()) { ?>
    <ul>
        <li><a href="<?php echo getImagePressProfileUri($current_user->ID, false)' ?>">View profile</a></li>
        <li><a href="<?php echo get_imagepress_option('cinnamon_edit_page'); ?>">Edit profile</a></li>
        <li><a href="<?php echo wp_logout_url(home_url()); ?>">Log out</a></li>
    </ul>
<?php } ?>
The code above allows you to add a simple user menu to your theme.
The profile editor allows you to see basic statistics about your account, set your account details, social details, author details, profile details and manage images and collections.
How to add and manage category images
You can enhance your ImagePress image categories by adding unique images for each category. With a user-friendly interface and seamless integration into the WordPress admin area, you can quickly upload, edit, and display images for your categories.
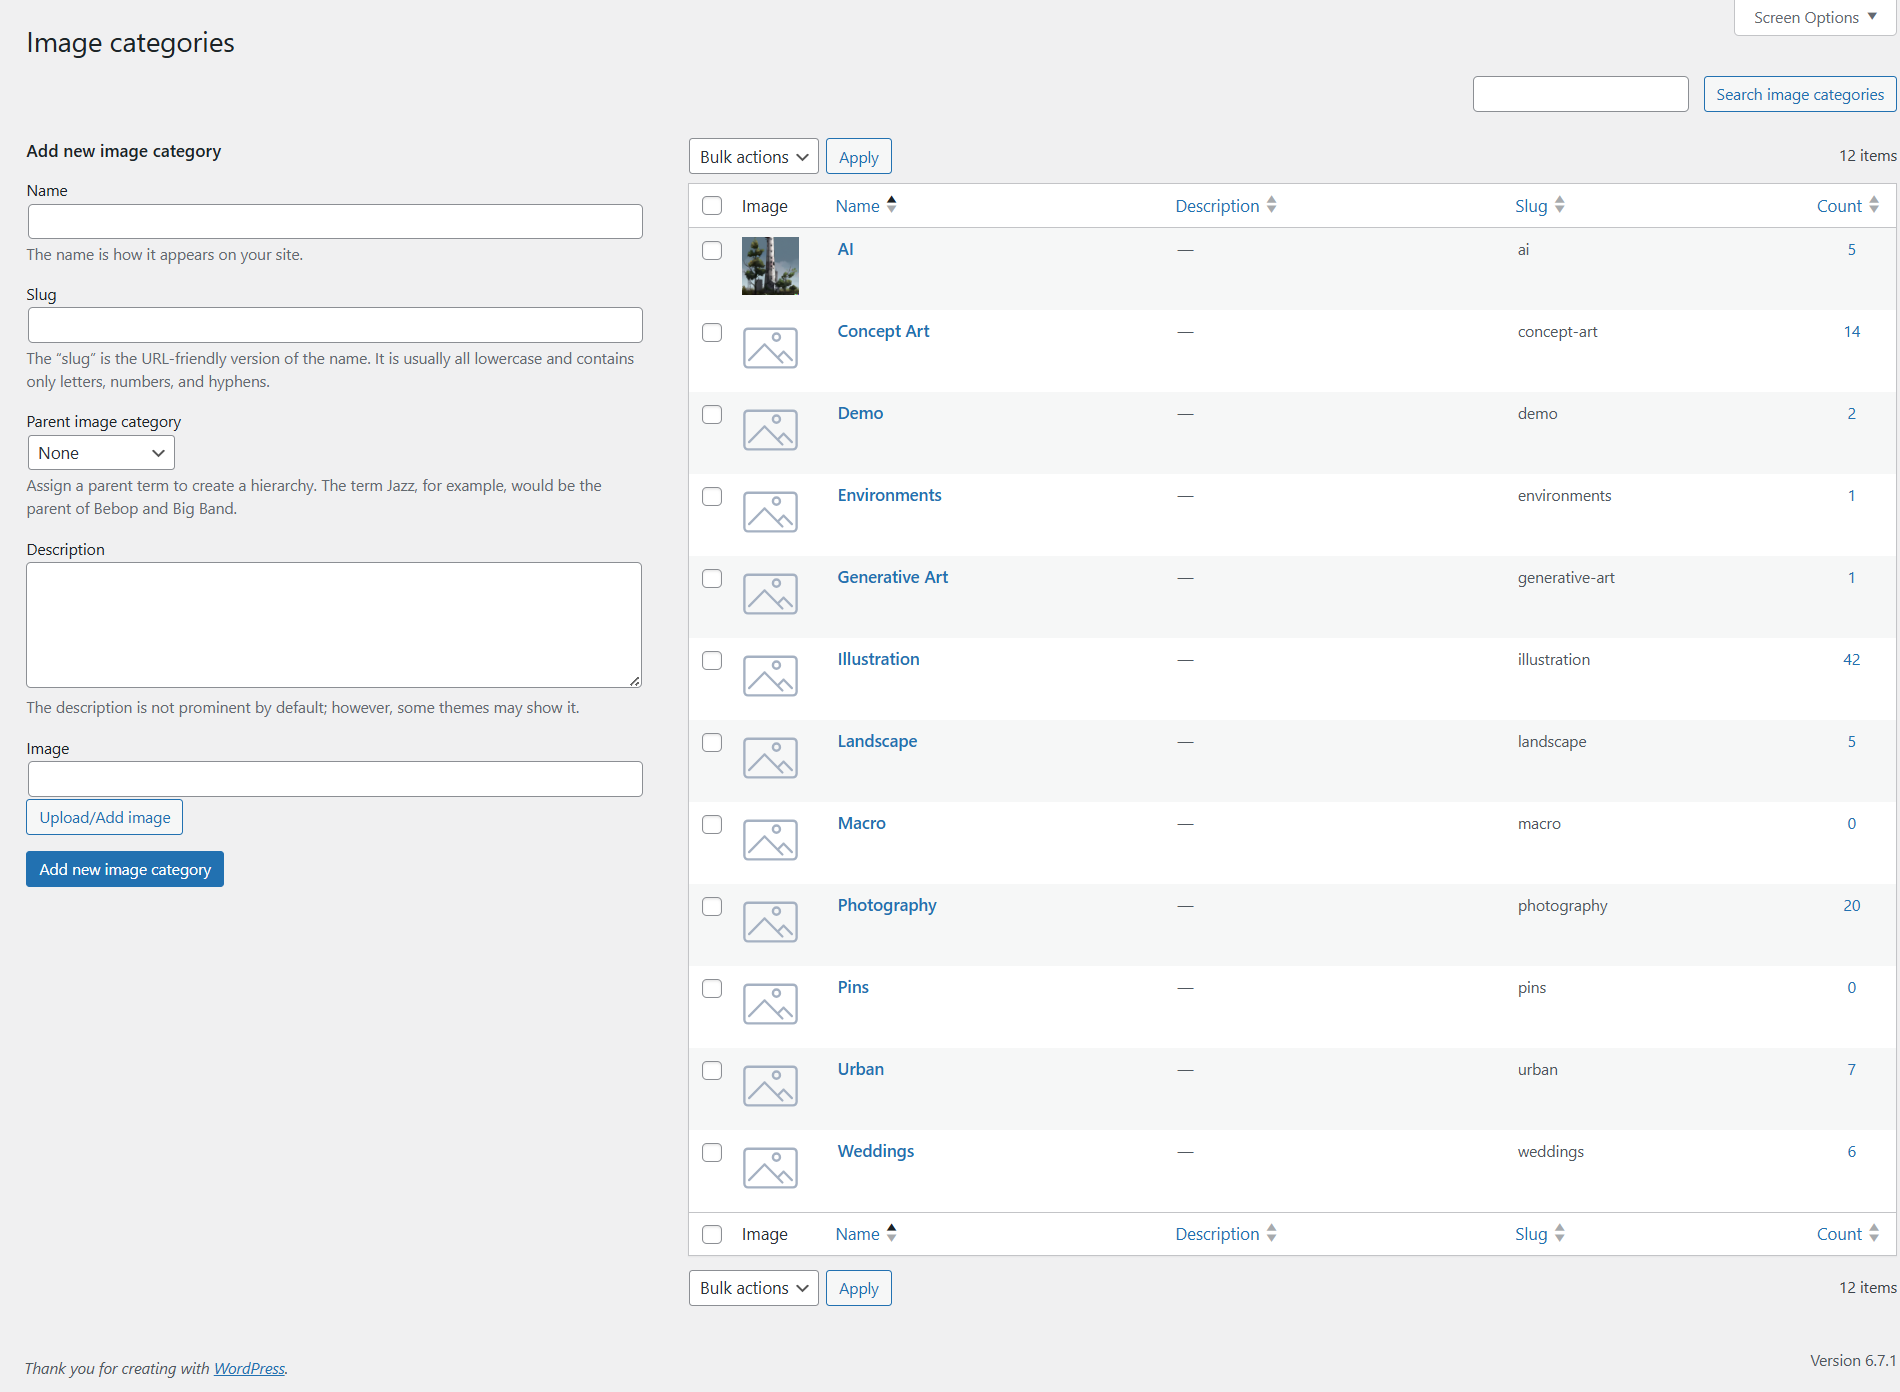
How It Works
- Add or Edit a Category
- Navigate to the ImagePress category management page.
- Use the “Upload/Add Image” button to select or upload your category image.
- Quick Edits Made Simple
- Use the Quick Edit option to update images directly from the category list.
- Preview in the Admin Panel
- Thumbnails of assigned images are displayed in the admin area, giving you a clear overview.
- Custom Display Options
- Use the built-in functions to display category images in your theme or plugin.
If you’re a developer, take advantage of hooks and filters to customize how images are managed and displayed. Functions like imagepress_ci_taxonomy_image() make it easy to retrieve and render images programmatically.
Image behaviour in ImagePress – single page or media view
There are two ways of displaying a gallery image: single view or media view. The ImagePress image behaviour dictates what to open when clicking on an image (single image or custom post template).
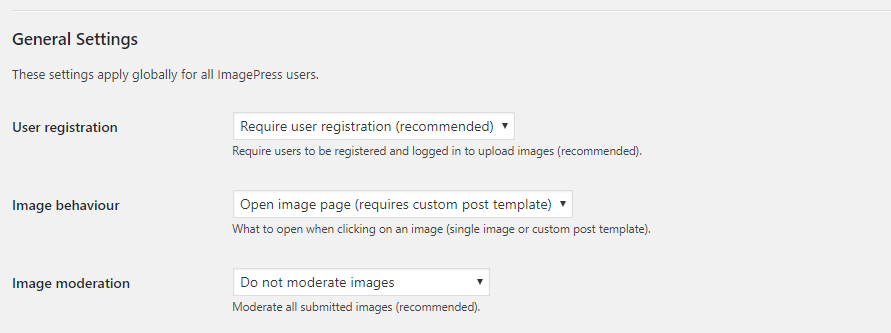
If you pick media view, all gallery images will open in a full tab, or, if you have a lightbox plugin installed and active, in a lightbox/modal window.
The media view requires no custom coding on your part.
The single view, on the other hand, requires setting up a new single template. The most basic example requires you to duplicate your single.php or singular.php template (or, in some cases, even page.php) and replace the_content() with if (function_exists('ip_main')) { ip_main(get_the_ID()); }. See a brief example below:
<?php get_header(); ?>

<section id="content" role="main">
    <?php if (have_posts()) : while(have_posts()) : the_post(); ?>
        <article id="post-<?php the_ID(); ?>" <?php post_class(); ?>>
            <?php
            /* BEGIN IMAGEPRESS CODE */
            if (function_exists('ip_main')) {
                ip_main(get_the_ID());
            }
            /* END IMAGEPRESS CODE */
            ?>
        </article>

        <?php comments_template('', true); ?>
    <?php endwhile; endif; ?>
</section>

<?php get_footer();
Your theme may have a different structure or use a loop template to display posts and pages.
How to create a collection
This tutorial will show you how to correctly configure the collections module and use it on your website.
The first step is to enable the Collections module:
Let’s create a collection viewer page and add this shortcode:
[[imagepress-collection collection="1"]]
Now let’s head to the Collections tab in your ImagePress Settings and select the viewer page from the dropdown:

That’s it!
The next step is to use the shortcode tag [[imagepress-collections count="4"]] in any post or page to display 4 collections. Note that in order for a collection to be visible, it needs to contain at least one image.
ImagePress: How to get random authors with at least one published image

This small function allows you to get random authors with at least one published image, excluding the ones you follow. This is a great feature for author discovery and new follows.
This feature works with ImagePress version 7 or higher.
add_action('pre_user_query', function($query) {
    if ('rand' === $query->query_vars['orderby']) {
        $query->query_orderby = str_replace('user_login', 'RAND()', $query->query_orderby);
    }
});

function get_random_feed_authors($number, $currentUserId) {
    $myFollowers = array(pwuf_get_following($currentUserId));
    $myFollowers = array_unique($myFollowers);
    $myFollowersToString = implode(',', $myFollowers[0]);

    $users = get_users(array(
        'fields' => array('ID', 'display_name'),
        'orderby' => 'rand',
        'number' => $number,
        'who' => 'authors',
        'exclude' => $myFollowers[0],
        'has_published_posts' => get_post_types(array('public' => true)),
        // 'query_id' => 'authors_with_posts', // not used anymore
    ));

    //shuffle($users); // optional

    return $users;
}
Use this in your theme’s functions.php file or in a custom plugin.
ImagePress – How to add videos
This feature has been added in ImagePress 7.7.4.
If you use secondary uploads, you can now upload videos (most likely MP4s). They will appear automatically, within the post content.
One small gotcha regarding MIME types: your server needs to be configured to recognize the various types. For Windows Server, that means adding entries for the various MIME types to IIS. For Apache servers, you’ll need to add the AddType directive to your httpd.conf or local .htaccess files:
AddType video/ogg .ogv
AddType video/mp4 .mp4
AddType video/webm .webm
Add more video types above, according to your requirements.
Note that this feature uses the HTML5 <video> element. Check out the browser compatibility table.
ImagePress: How to display popular images
This small function allows you to display most popular images from the past week and cache the results for 24 hours.
Note that you need to change your post_type, if it’s different from image.
This feature works with ImagePress version 7 or higher.
function feed_most_viewed($count) {
    // Get transient
    $is = get_transient('popular-images');

    if (false === ($the_query = get_transient('popular-images'))) {
        $args = array(
            'post_type' => 'image',
            'posts_per_page' => $count,
            'orderby' => 'meta_value_num',
            'meta_key' => 'post_views_count',
            'meta_query' => array(
                array(
                    'key' => 'post_views_count',
                    'type' => 'numeric'
                )
            ),
            'date_query' => array(
                array(
                    'after' => '1 week ago'
                )
            ),
        );

        $is = get_posts($args);

        // Set transient, and expire after 24 hours
        set_transient('popular-images', $is, 1 * DAY_IN_SECONDS);
    }

    if ($is) {
        $display = '<ul>';
            foreach ($is as $i) {
                $post_thumbnail_id = get_post_thumbnail_id($i->ID);
                $postAuthor = $i->post_author;

                if (has_post_thumbnail($i->ID)) {
                    $display .= '<li>' . do_shortcode('[follow_links follow_id="' . $postAuthor . '"]') . '<a href="' . get_permalink($i->ID) . '" class="regular-link"><b>' . get_the_title($i->ID) . '</b></a><br><small>by <a href="' . get_author_posts_url($postAuthor) . '" class="regular-link">' . get_the_author_meta('display_name', $postAuthor) . '</a></small><br><br><a href="' . get_permalink($i->ID) . '">' . wp_get_attachment_image($post_thumbnail_id, 'thumbnail') . '</a>
</li>';
                }
            }
        $display .= '</ul>';
    }

    return $display;
}
Use this in your theme’s functions.php file or in a custom plugin.
ImagePress: How to add a default avatar
This small function allows you to change the default WordPress avatar when using ImagePress and skip all WordPress-generated ones.
This feature works with ImagePress version 7 or higher.
add_filter('avatar_defaults', 'imagepress_default_gravatar');

function imagepress_default_gravatar($avatar_defaults) {
    $myavatar = 'path/to/your/avatar.jpg';
    $avatar_defaults[$myavatar] = 'Default ImagePress Avatar';

    return $avatar_defaults;
}
Use this in your theme’s functions.php file or in a custom plugin.

Hooks
How to add content to the single image template
Note: This code should be added to a custom functionality plugin, not to your theme and not to ImagePress itself.
The single image template has two sections: the main image and the sidebar.
For these two sections, there are two hooks available – imagepress_main_content and imagepress_sidebar_content.
<?php
add_action( 'imagepress_main_content', 'my_hook_main_callback' );
add_action( 'imagepress_sidebar_content', 'my_hook_sidebar_callback' );
Let’s add some content below the image:
<?php
function my_hook_main_callback( $image_id ) {
    echo '<p>This is additional content, a notification, a link, an announcement or anything else.</p>';
}

add_action( 'imagepress_main_content', 'my_hook_main_callback' );
Now, let’s add something more advanced to the sidebar, a link to a downloadable, high-resolution image. Note that the image ID is available as an $image_id variable.
There are two options:
1. Show the large size image (defined in ImagePress Settings → Image Settings) and display a download button for the full size image.
2. Use the native downloadable image feature.
<?php
function my_hook_sidebar_callback( $image_id ) {
    // 1. Full size image URL
    $post_thumbnail_id  = get_post_thumbnail_id( $image_id );
    $image_attributes   = wp_get_attachment_image_src( $post_thumbnail_id, 'full' );
    $post_thumbnail_url = $image_attributes[0];

    echo '<p>
        <a href="' . $post_thumbnail_url . '" class="thin-ui-button thin-ui-button-regular thin-ui-button-neutral" download><i class="icofont-download"></i> Download</a>
    </p>';

    // 2. Downloadable attachment URL
    $parent_id     = $image_id;
    $attachment_id = imagepress_get_downloadable_attachment_id( $parent_id );

    if ( $attachment_id ) {
        // Attachment with 'imagepress_is_downloadable' meta key value of 1 found
        echo '<p>
            <a href="' . wp_get_attachment_url( $attachment_id ) . '" class="thin-ui-button thin-ui-button-regular thin-ui-button-neutral" download><i class="icofont-unlock"></i> Download</a>
        </p>';
    } else {
        // No matching attachment found
    }
}

add_action( 'imagepress_sidebar_content', 'my_hook_sidebar_callback' );
Only use one option, otherwise you will end up with two buttons.
Now, let’s add an even more advanced button to the sidebar. For example, if you have paid plans and are using a membership plugin, you can use the membership plugin’s native functions to check for a specific plan.
In the example below, I am using the Paid Member Subscriptions plugin, and I am testing for a downloadable image, a logged-in user, and a plan with ID 123. If all conditions are met, then the button is displayed.
<?php
function my_hook_sidebar_callback( $image_id ) {
    // 1. Paid Member Subscriptions plugin
    $parent_id     = $image_id;
    $attachment_id = imagepress_get_downloadable_attachment_id( $parent_id );

    if ( $attachment_id && is_user_logged_in() && pms_is_member_of_plan( [123] ) ) {
        // Attachment with 'imagepress_is_downloadable' meta key value of 1 found
        echo '<p>
            <a href="' . wp_get_attachment_url( $attachment_id ) . '" class="thin-ui-button thin-ui-button-regular thin-ui-button-neutral" download><i class="icofont-unlock"></i> Download</a>
        </p>';
    } else {
        // No matching attachment found
    }
}

add_action( 'imagepress_sidebar_content', 'my_hook_sidebar_callback' );
In the example below, I am using the Paid Memberships Pro plugin, and I am testing for a downloadable image, a logged-in user, and a plan with ID 123. If all conditions are met, then the button is displayed.
<?php
function my_hook_sidebar_callback( $image_id ) {
    // 2. Paid Memberships Pro plugin
    $parent_id     = $image_id;
    $attachment_id = imagepress_get_downloadable_attachment_id( $parent_id );

    if ( $attachment_id && is_user_logged_in() && pmpro_hasMembershipLevel( 123 ) ) {
        // Attachment with 'imagepress_is_downloadable' meta key value of 1 found
        echo '<p>
            <a href="' . wp_get_attachment_url( $attachment_id ) . '" class="thin-ui-button thin-ui-button-regular thin-ui-button-neutral" download><i class="icofont-unlock"></i> Download</a>
        </p>';
    } else {
        // No matching attachment found
    }
}

add_action( 'imagepress_sidebar_content', 'my_hook_sidebar_callback' );
Using the same function as above, you can replace the bold code with your own plugin’s code.
Frequently Asked Questions
Q: How do I migrate from [[imagepress_top]] to the new [[imagepress]] shortcode?
A: ImagePress uses a new, universal shortcode, [[imagepress]]. This shortcode replaces the top image (most viewed image or most liked image). To replace your old shortcodes, just replace the [[imagepress_top]] shortcode with [[imagepress type="top" mode="views" count="1"]] to display the most viewed image or [[imagepress type="top" mode="likes" count="1"]] to display the most voted image.
Q: How do I set a default collection for all uploads?
A: There is no default option for this behaviour, so the code below will accomplish this. Add it to your JS functions file and change the 55 with your collection ID:
document.addEventListener('DOMContentLoaded', function() {
  var selectElement = document.querySelector('.ip-uploader #ip-collections');
  var createNewElement = document.querySelector('.ip-uploader .ip-collection-create-new');

  if (selectElement) {
    selectElement.value = '55';
    selectElement.disabled = true;
  }

  if (createNewElement) {
    createNewElement.style.display = 'none';
  }
});
Q: How do I show an image grid sorted by likes?
A: Use the [[imagepress-loop sort=”likes” count=”10″]] shortcode.
ImagePress Filters
Example #1
This example will add a custom field value to the ip_box_bottom element in image grid:
function ip_get_custom_field($id) {
    $field = get_post_meta($id, 'fieldname', true);

    return $field;
}
add_filter('do_ip_box_bottom', 'ip_get_custom_field');
Optimizing Image Upload Speed for the ImagePress WordPress Plugin
By following the recommendations below, you can ensure a swift and efficient uploading process for all users.
Part 1: Pre-Upload Optimization (Client-Side Best Practices)
Before an image is even uploaded to your WordPress site, there are several steps that can be taken to reduce its file size, which is the single most important factor in upload speed.
1. Resize Images to Appropriate Dimensions:
High-resolution images from modern cameras and smartphones are often much larger than what is necessary for web display. A 5MB, 4000-pixel wide image will take significantly longer to upload than a 300KB, 1200-pixel wide image.
- Best Practice: Before uploading, resize images to the maximum dimensions they will be displayed at on your website. For a typical full-width blog post image, this might be between 1200 and 1920 pixels wide. For smaller gallery thumbnails, the dimensions will be even smaller.
- Tools: Use free image editing software like GIMP, or online tools like Photopea, Pixlr or Canva to resize your images.
2. Compress Images to Reduce File Size:
Image compression reduces the file size of an image with minimal to no perceptible loss in quality.
- Best Practice: Run all images through a compression tool before uploading.
- Tools:
- TinyPNG/TinyJPG: A popular online tool that uses smart lossy compression to significantly reduce the file size of PNG and JPEG images.
- ImageOptim: A free application for Mac that optimizes images.
- Squoosh: A powerful, browser-based image compression tool by Google.
3. Choose the Right File Format:
The file format of your image also impacts its size.
- JPEG: Ideal for photographs and images with many colors. You can adjust the quality level to find a good balance between file size and image quality.
- PNG: Best for images with transparency, like logos. PNG files are often larger than JPEGs.
- WebP: A modern image format that provides superior lossless and lossy compression for images on the web. WebP images are significantly smaller than JPEGs and PNGs. Many modern themes and plugins now support WebP.
Part 2: WordPress & Server-Side Optimization
Once you’ve optimized your images on the client-side, you can further enhance upload speeds through WordPress plugins and server-side configurations.
1. Utilize an Image Optimization Plugin:
These plugins can automatically compress and resize images as they are uploaded to your WordPress media library. This is especially useful for a multi-user site with ImagePress, as it automates the optimization process for all users.
- Recommended Plugins:
- Smush: A popular, user-friendly plugin that offers lossless compression, lazy loading, and image resizing.
- ShortPixel Image Optimizer: Provides both lossy and lossless compression and offers a generous free tier.
- Imagify: Created by the developers of WP Rocket, this plugin is easy to use and offers aggressive compression options.
2. Implement Lazy Loading:
Lazy loading is a technique where images are only loaded when they are about to enter the user’s viewport. This doesn’t directly speed up the initial upload, but it dramatically improves the perceived performance of your gallery pages, which is a key part of the ImagePress experience.
- How to Implement:
- Built-in WordPress Lazy Loading: WordPress has native lazy loading for images.
- Caching and Optimization Plugins: Plugins like WP Rocket and the image optimization plugins mentioned above often include more advanced lazy loading features.
3. Adjust PHP Settings (for advanced users):
For users who are comfortable editing their server configuration, adjusting certain PHP settings can resolve issues with large file uploads and timeouts, which are common with bulk uploads. Caution: Make a backup of your files before making any changes. These settings can typically be adjusted in your php.ini, .htaccess, or wp-config.php file.
upload_max_filesize: The maximum size of an uploaded file.post_max_size: The maximum size of all POST data. This should be larger thanupload_max_filesize.max_execution_time: The maximum time in seconds a script is allowed to run. For bulk uploads, this may need to be increased.
Example for wp-config.php:
PHP
@ini_set( 'upload_max_size' , '64M' );
@ini_set( 'post_max_size', '64M');
@ini_set( 'max_execution_time', '300' );
Part 3: Advanced Techniques for Optimal Performance
For sites with very high traffic or a large number of user-submitted images, these advanced techniques can provide a significant performance boost.
1. Use a Content Delivery Network (CDN):
A CDN stores copies of your website’s static content, including images, on servers around the world. When a user visits your site, the images are served from the server closest to them, which can improve both image loading times and, in some cases, upload performance.
- Popular CDN Providers: Cloudflare, StackPath (formerly MaxCDN), KeyCDN.
2. Check for Theme and Plugin Conflicts:
In some cases, a poorly coded theme or another plugin can interfere with the upload process, causing it to slow down.
- Troubleshooting: If you are experiencing slow uploads, try temporarily switching to a default WordPress theme (like Twenty Twenty-Four) and deactivating all other plugins except for ImagePress to see if the issue is resolved. If it is, reactivate your theme and plugins one by one to identify the culprit.
3. Consider Your Hosting Environment:
Shared hosting plans can sometimes have limited resources, which can lead to slower performance during resource-intensive tasks like bulk image uploads. If you have a high-traffic site with many user uploads, it may be worth considering an upgrade to a VPS or managed WordPress hosting plan.
Tips and Tricks for Bulk/Multiple Image Uploads
Uploading a large number of images at once presents its own set of challenges. Here are some tips for a smoother experience:
- Upload in Smaller Batches: Instead of trying to upload 100 images at once, break them into smaller groups of 10-20. This is less likely to trigger server timeouts.
- Use FTP for Very Large Batches: For uploading a very large number of images, using a File Transfer Protocol (FTP) client like FileZilla can be more reliable than the WordPress media uploader. After uploading the images via FTP, you can use a plugin like “Media from FTP” to register them in your WordPress media library.
- Be Mindful of Server Timeouts: If your bulk uploads are consistently failing, it is likely due to the
max_execution_timesetting on your server. Refer to the PHP settings section for guidance on how to increase this value.
By implementing these strategies, you can significantly improve the image upload speed for your ImagePress-powered website, leading to a better experience for both you and your users.