Table of Contents
WordPress Security Layers
When dealing with WordPress security, we need to start from the bottom of the stack and go up. There’s usually not much to do up there, except for security analysis.
I’ll call these security layers.
Note that this article is the tip of the iceberg only. There are many more tricks and possible configurations for your site to prevent attacks. Also note that, given the time, hardware technology and server knowledge, any site can be hacked.
Layer 1
We’ll start with the hosting provider, and we’ll check our server software, which can be Apache, Nginx, LiteSpeed or any other flavour or variation of the above. We need to make sure we have the latest version (or a newer one, at least).
- If the site is on a shared server, we can contact the hosting provider by using the integrated chat service, raise a ticket and post a question on the public forum.
- If the site is hosted on a VPS server, we might have more options to select the server software type and, maybe, version.
- If the site is hosted on a dedicated server, it’s up to us to upgrade the server software – or hire a Linux expert.


I use a DreamHost VPS, and I am more than happy with what they provide.
See server software usage comparison in the images below:
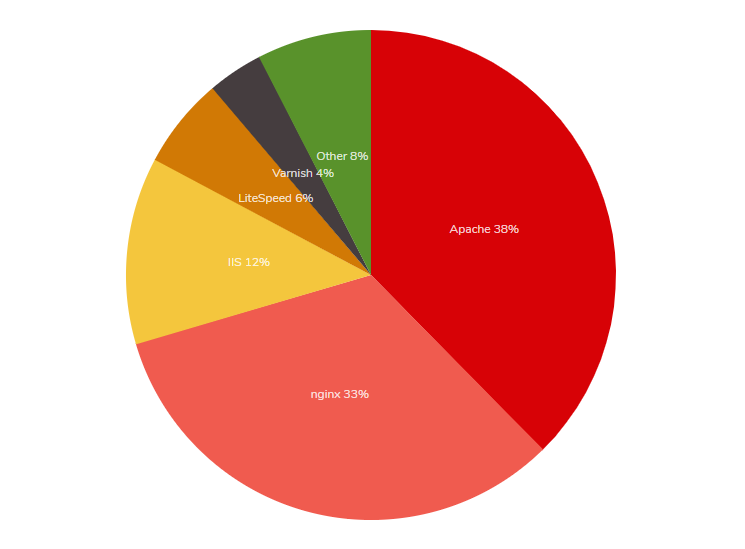
Source: trends.builtwith.com/web-server
| © W3Techs.com | usage | change since 1 February 2020 | |
|---|---|---|---|
| 1. | Apache | 39.8% | -1.4% |
| 2. | Nginx | 31.8% | +0.2% |
| 3. | Cloudflare Server | 13.6% | +0.8% |
| 4. | Microsoft-IIS | 7.8% | -0.1% |
| 5. | LiteSpeed | 6.3% | +0.5% |
Fastest growing web servers since 1 February 2020, daily number of additional sites in the top 10 million
| © W3Techs.com | sites |
|---|---|
| 1. Cloudflare Server | 1,617 |
| 2. LiteSpeed | 1,025 |
| 3. Nginx | 582 |
Source: w3techs.com
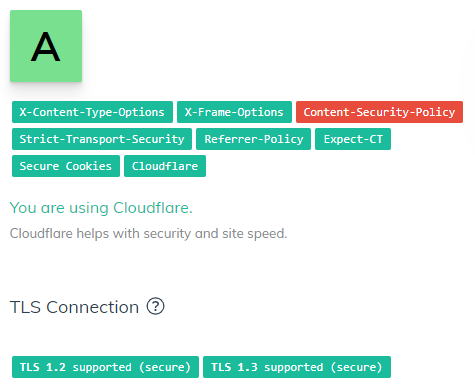
The next check is server encryption and OpenSSL. Depending on the server software, we need to make sure we have the latest OpenSSL module. There are OpenSSL vulnerability checkers out there, just do a quick Google search. Here are some relevant ones:
- SecurityHeaders.com
- Pentest Tools – SSL/TLS scanner
- My own security headers checker (plus Mozilla Observatory)
Also, make sure you’re using the latest version of the TLS protocol, 1.3 at the time of writing this article. My Lighthouse plugin will show you which version you’re using and how to upgrade.
Recommendation: Use Apache if you need more flexibility, WordPress compatibility, and less technical work. Use Nginx if you’re not afraid of getting your hands “code-dirty”.
Layer 2
The next layer, much easier to modify, is the server technologies, PHP and MySQL. Sometimes you can change the version yourself from your Plesk panel, cPanel, or custom hosting panel. Sometimes, all you need to do is contact the host, and they will upgrade PHP/MySQL version immediately. Sometimes you need to switch hosts.
Read more about supported PHP versions.
Recommendation: Use PHP 8.3 or higher. We recommend PHP 8+. Use MySQL 5.7 or higher. We recommend 8+, or the Percona alternative.
Layer 3
HTTPS. Get an SSL certificate. If your host allows for Let’s Encrypt, use it. Use it for all your sites and never look back. If not, buy one. It can be as cheap as $8/year at https://www.ssls.com/. Note that you will have to change the structure of all your internal links, rewrites, and redirects on your site. It might get a bit tedious.
Check your SSL implementation at https://www.ssllabs.com/ssltest/.
Layer 4
.htaccess tricks
I will focus on Apache here – comment in the form below if you need to know more about Nginx.
Before reaching WordPress, getting the list of plugins, reading the database and allowing security plugins to kick in, we need to check the visitors upon initial connection. We do this and block malicious requests in our .htaccess file, in the root of our site.
Here are some of them:
#Block directory browsing:

Options -MultiViews

<IfModule mod_autoindex.c>
    Options -Indexes
</IfModule>

#Detect and block cross-site scripting:

Header always set X-Content-Type-Options "nosniff"
Header always set X-XSS-Protection "1; mode=block"
Header always set X-Frame-Options "ALLOW-FROM https://example.com/"

#Set up Content Security Policy:

Header always set Content-Security-Policy "default-src https: data: 'unsafe-inline' 'unsafe-eval'"

#Remove sensitive server details:

Header unset X-Powered-By
ServerSignature Off

#Block access based on IP address and/or domain name:

Order allow,deny
Deny from 255.0.0.0
Deny from 123.45.6.
Deny from 192.168.205
Deny from unwanted-domain.com unwanted-domain-2.com
Deny from domain-part
Allow from all| IP formats | |
|---|---|
| Single IP Address | 10.5.3.333 (Only this IP will be blocked) |
| Implied Range | 10.5.3.3-10.5.3.40 (This blocks a range of IP’s that fit the parameters between IP 10.5.3.3 and 10.5.3.40) |
| CIDR Format | 10.5.3.3/32 (This blocks all IP’s in the 10.3.3 range from 10.3.3.00 to 10.3.3.32) |
| Implied IP Address | 10. Implies 10.*.*.* (blocks all IP’s starting with 10.) |
Read more relevant information at https://perishablepress.com/stupid-htaccess-tricks/#security.
Layer 5
WordPress plugins and common sense
If everything above is implemented correctly and properly, you don’t need an extra layer of protection. Plugins require access to the database – while slowing down your website – in order to block attackers, so a repeated DDoS attack would still be able to request your WordPress to access the database in order to read the list of blacklisted IP addresses. Imagine an attacker pinging your site thousands of times per minute and a security plugin trying to check the IP address and/or the referrer every time. Imagine again the attacker being blocked when initially connecting to your site – using .htaccess – with no database ping and no WordPress initialization.
Recommendation: Use Sucuri Scanner plugin to keep an eye on what is going on with your site.
Recommendation: Use the ultimate .htaccess guide to unlock more features.
WordPress Security Checklist

I am managing more than 200 client sites between my contractors, my clients and my full-time job. The most important thing I have to consider is data security. While regular backups are always in place, hackers, crackers, and spammers should also be kept at bay.
Part 1
What you have to consider:
1. Secure server configuration
As we’re talking about WordPress, you should have the latest versions of Apache/Nginx, PHP and MySQL on your server. The most important of these three is PHP. Because WordPress is built on PHP and most plugins are also built on PHP (with lots of them sporting outdated code), you should use the latest version available on your server. Some hosts allow for version switching inside your .htaccess file. Before going for it, you should check your theme and plugins and see if they generate any notices, warnings, or errors. Use the debugging options for this, while in maintenance mode.
2. Secure/encrypted connection
An SSL connection is expected, just as mobile responsiveness is now a must for Google ranking.
SSL (Secure Sockets Layer) is the standard security technology for establishing an encrypted link between a web server and a browser. This link ensures that all data passed between the web server and browsers remains private and integral.
An SSL certificate is purchased yearly and is installed on your server. Prices range from high to very high, but for sensitive data websites or e-commerce sites, it should be a requirement. Some CDNs offer free (shared) certificates (see Cloudflare).
3. Site/code/database protection
This is an ongoing process, and it involves having an active firewall (see Cloudflare or Sucuri), constant access notifications and constant checks. These are usually performed by plugins (see my previous article for some recommendations) and should be carried out regularly.
Part 2
What you should be aware of when having a live site:
a. Hackers
These guys are the most dangerous ones, as they can exploit code vulnerabilities and inject hidden code to either supply passwords and account information or to add links to spam websites (usually pharmaceutical products, online gambling sites and online stores).
b. Crackers
These guys usually crack passwords either by exploiting code vulnerabilities (such as visible HTTP headers or visible PHP notices, warnings and errors) or by using brute force attacks, trying hundreds of passwords each minute. The result is either password cracking or your server being brought to its knees (your host will probably restrict access to your site or ask you to clean your site before going live again). If your business depends on your site, you are losing money until you fix your site.
c. Spammers
Depending on the content of your site, you may allow comments. These guys will post fake comments with links to various sites (usually pharmaceutical products, online gambling sites and online stores). They typically use automated software to post comments on thousands of sites. Make sure you have Akismet enabled and working. Also, make sure you have either Stop Spammers plugin or Antispam Bee plugin active.
d. Sploggers
If you have a multisite WordPress installation, these guys will create lots of fake accounts and sites. Make sure you use double opt-in account registration, email checking and clean up your user base regularly.
We have updated our Lighthouse plugin to stop spam registrations, and it’s doing a really great job. You shouldn’t take our word for it, you should try it yourself.
HSTS Preloading
By adding the Strict Transport Security header to your site, you secure every visit from your visitors except for the initial visit. That still leaves your site vulnerable to MITM (man-in-the-middle) attacks for that initial visit, so there is a technique called “preloading” that will add your site to a pre-populated domain list. Once your site is on that list, the major browsers that support HSTS preloading will be notified that your site requires SSL, and every visit, even the very first one from a visitor, will automatically be forced through SSL.
If you want to enable this for your site, there are a few requirements before you can make that trigger:
- Have a valid SSL certificate.
- You must redirect all HTTP traffic to HTTPS (recommended via 301 permanent redirects). This means that your site should be HTTPS only.
- You must serve all subdomains from HTTPS as well. If you have subdomains, you will need a wildcard SSL certificate for this.
- Serve an HSTS header on the base domain that meets the following requirements:
- The expiration length must be at least 18 weeks (10886400).
- The
includeSubDomainstoken must be specified in the header. - The
preloadtoken must be specified in the header. - If you are serving a redirect, that redirect must have the HSTS header too, not just on the pages it redirects to.
Now, when visitors come to your site, the browser will be notified that you want to be on the preload list. Assuming that you meet all the requirements, you should see your site loaded in that list within a few months.
If using WordPress, some changes are required in order for the site to fully translate to HTTPS:
Add the following lines to your .htaccess file:
#<IfModule mod_rewrite.c>
#RewriteEngine On
#RewriteCond %{SERVER_PORT} 80
#RewriteRule ^(.*)$ https://example.com/$1 [R,L]
#</IfModule>

# Force HTTPS
RewriteEngine On
RewriteCond %{HTTPS} off
RewriteRule (.*) https://%{HTTP_HOST}%{REQUEST_URI} [R=301,L]
Changed both URLs in Settings → General, remove Cloudflare (if installed) and restart the server. With a valid SSL certificate, there is no need for extra HTTPS plugins or redirections.
If you want to check your site’s preload status, you can do it here: https://hstspreload.org/
Be aware that inclusion in the preload list cannot really be undone. You can request to be removed, but it will take months for the deleted entry to reach users with a Chrome update, and we cannot make guarantees about other browser vendors. Don’t request inclusion unless you’re sure that you can support HTTPS for the long term.
Note that our WordPress security plugin – Lighthouse – allows administrators to switch the HSTS header on and off. If you’re using WordPress, Lighthouse will help improve the speed of your website.
Internet Explorer users are still vulnerable. Nevertheless, it’s worth implementing, as it’s an official IETF standard.
Check out the compatibility table.
Also, you don’t want to implement this unless you’re using HTTPS, but why aren’t you using HTTPS? Remember that HTTPS not only guarantees that your content (and the users’ content) will be encrypted and therefore un-interceptable, it also provides authenticity, promising your users that yes, this content really came from you.
But if you’re using HTTPS, you should use HSTS too.
Partial sources:
https://thomasgriffin.io/enable-http-strict-transport-security-hsts-wordpress/
https://chromium.googlesource.com/chromium/src/net/+/master/http/transport_security_state_static.json
https://developer.mozilla.org/en-US/docs/Web/Security/HTTP_strict_transport_security
Quick guide to HTTPS, SSL and web security
We have just released a Lighthouse update. The plugin now recommends HTTPS by default, HTTP/2 by default and PHP 8.3 by default. They are all textual recommendations, though, and they do not block the plugin or your site from functioning.
Here are the first steps you need to take in order to secure your website and make it faster.
Get Lighthouse. Obviously.
Lighthouse will secure your website, and it will make it run faster. Tests showed at least 30% in loading speed increase. Combined with the latest server software and HTTP/2, your site should get blazing speed.
Get an SSL certificate. Obviously.
You have two options:
- Get a free SSL certificate from Let’s Encrypt.
- Get a certificate deal. A good one.
Depending on your hosting provider, you might get access to free SSL certificates from Let’s Encrypt. Let’s face, this is the future. Let’s Encrypt is a free, automated, and open Certificate Authority. I use DreamHost for some of my clients, and I am very happy with their free SSL setup.
For paid certificates, I recommend SSLs.com. I got a great deal for 4.99/year for 2 years. I moved to Let’s Encrypt since then, but if my hosting provider hadn’t offered me this option, I would have stayed with SSLs.
Note: SSLs.com is a Namecheap brand.
Upgrade your server software.
Start chatting, open a ticket, or check your hosting control panel. You might be able to get your PHP version to the latest one, 8.1. I, personally, know at least 2 hosts here, in Ireland, who offer PHP 8.
Also, ask for HTTP/2. If you don’t have a VPS, you will need to ask your host if they support it. If not, you should consider moving to another host.
If a host will not support PHP 8, Let’s Encrypt and HTTP/2 in the next 3 to 6 months, it’s time to ditch them.
Secure your site with these small, but effective, changes.
In order to prevent XSS, framing and injection, add the following lines to your configuration files, based on your server type (nginx.conf or .htaccess):
X-Frame-Options
nginx: add_header X-Frame-Options "SAMEORIGIN" always;
Apache: Header always set X-Frame-Options "SAMEORIGIN"
Valid values include DENY meaning your site can’t be framed, SAMEORIGIN which allows you to frame your own site, or ALLOW-FROM https://example.com/ which lets you specify sites that are permitted to frame your own site. Note that this directive will prevent your site from being embedded into another site. Also note that you cannot specify multiple allowed sites.
X-Xss-Protection
nginx: add_header X-Xss-Protection "1; mode=block" always;
Apache: Header always set X-Xss-Protection "1; mode=block"
X-Content-Type-Options
nginx: X-Content-Type-Options "nosniff" always;
Apache: always set X-Content-Type-Options "nosniff"
That’s it. This quick guide ends here and, if followed correctly, it will make your site 100% more secure and faster.